Jekyll2026-04-03T20:23:36+00:00https://neildeighan.com/feed.xmlNeil DeighanProject based tutorials in software and electronics.Sounduino2021-04-07T00:00:00+00:002021-04-07T00:00:00+00:00https://neildeighan.com/sounduino-sound-with-arduinoSounduino
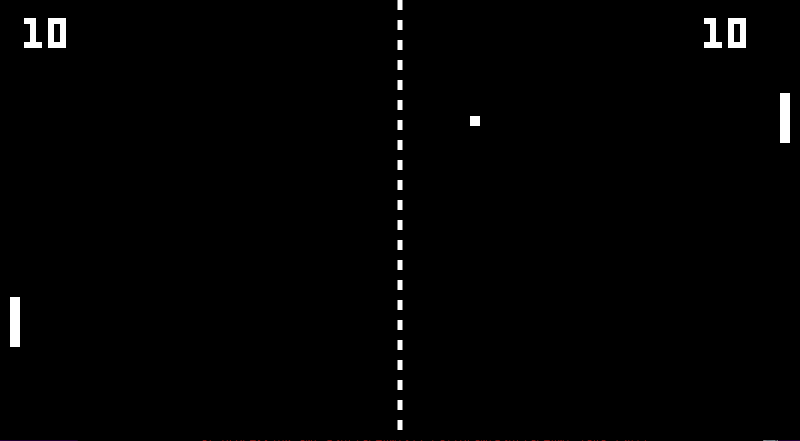
What would a video game be without sound? Not a very good one! So we are going to add a piezo to the circuit to generate game sounds and also add some processing code, so that when the Arduino UNO is disconnected, sound will play through your computer speakers.
Introduction
After some digging on the web, I managed to find the actual frequency and duration for the sounds used in the original Pong game…
Sound
Frequency
Duration
Listen
Ball hits wall
226 Hz
16 ms
Paddle hits ball
459 Hz
96 ms
Point scored
490 Hz
257 ms
… I have implemented these into the Arduino Pronguino Library Speaker class, and also created Waveform Audio files for each of the game sounds (which are also used in the table above) that are played through the Speaker class in the Processing code, these .wav files were generated using an online tone generator, there are quite a few to choose from, and will ask for some/all of the following parameters…
Parameter
Wall Sound
Paddle Sound
Point Sound
Depth
16-bit
16-bit
16-bit
Wave
Square
Square
Square
Frequency (Hertz)
226 Hz
459 Hz
490 Hz
Duration (Milliseconds)
16 ms
96 ms
257 ms
Sample Rate (Kilohertz)
14.1 kHz
14.1 kHz
14.1 kHz
Amplitude/Volume
(experiment)
(experiment)
(experiment)
Challenge: Find or create more modern versions of these game sounds, maybe tennis / table tennis sounds ?
Scope
Description
Circuit
Adding a piezo buzzer to the existing circuit.
Arduino
Extending the component and Pronguino libraries with piezo support. Using the tone() function to generate sounds.
Processing
Adding sound playback via the Minim library as a fallback when the Arduino is disconnected.
Game
Triggering sounds on game events: ball hitting a wall, a paddle, and a point being scored.
Learning
Description
Piezo Buzzer
How a piezo buzzer works and how to wire it to the Arduino.
tone() Function
How to generate square wave tones at a specific frequency and duration using the Arduino tone() function.
Game Sounds
How the original Pong game sounds were reproduced using specific frequencies and durations.
Minim Library
How to use the Processing Minim library to play .wav audio files.
Software Fallback
How to design code that adapts behaviour based on whether the Arduino is connected.
Getting Started
Recommended
I recommend reading through the Servuino and subsequent posts, as we are building circuit on top of the one built in Servuino.
Components
All the components that you need listed here are in the Arduino Starter Kit, as mentioned above, this is being built on top of previously built circuit, see existing components list, as well as the following…
Component
Quantity
Piezo
1
5mm orange wire
1
20mm blue wire
1
Note: I have been specific on the length in particular on the above wires, mainly for the smaller ones that are used just on the breadboard, so they are as flat as possible.
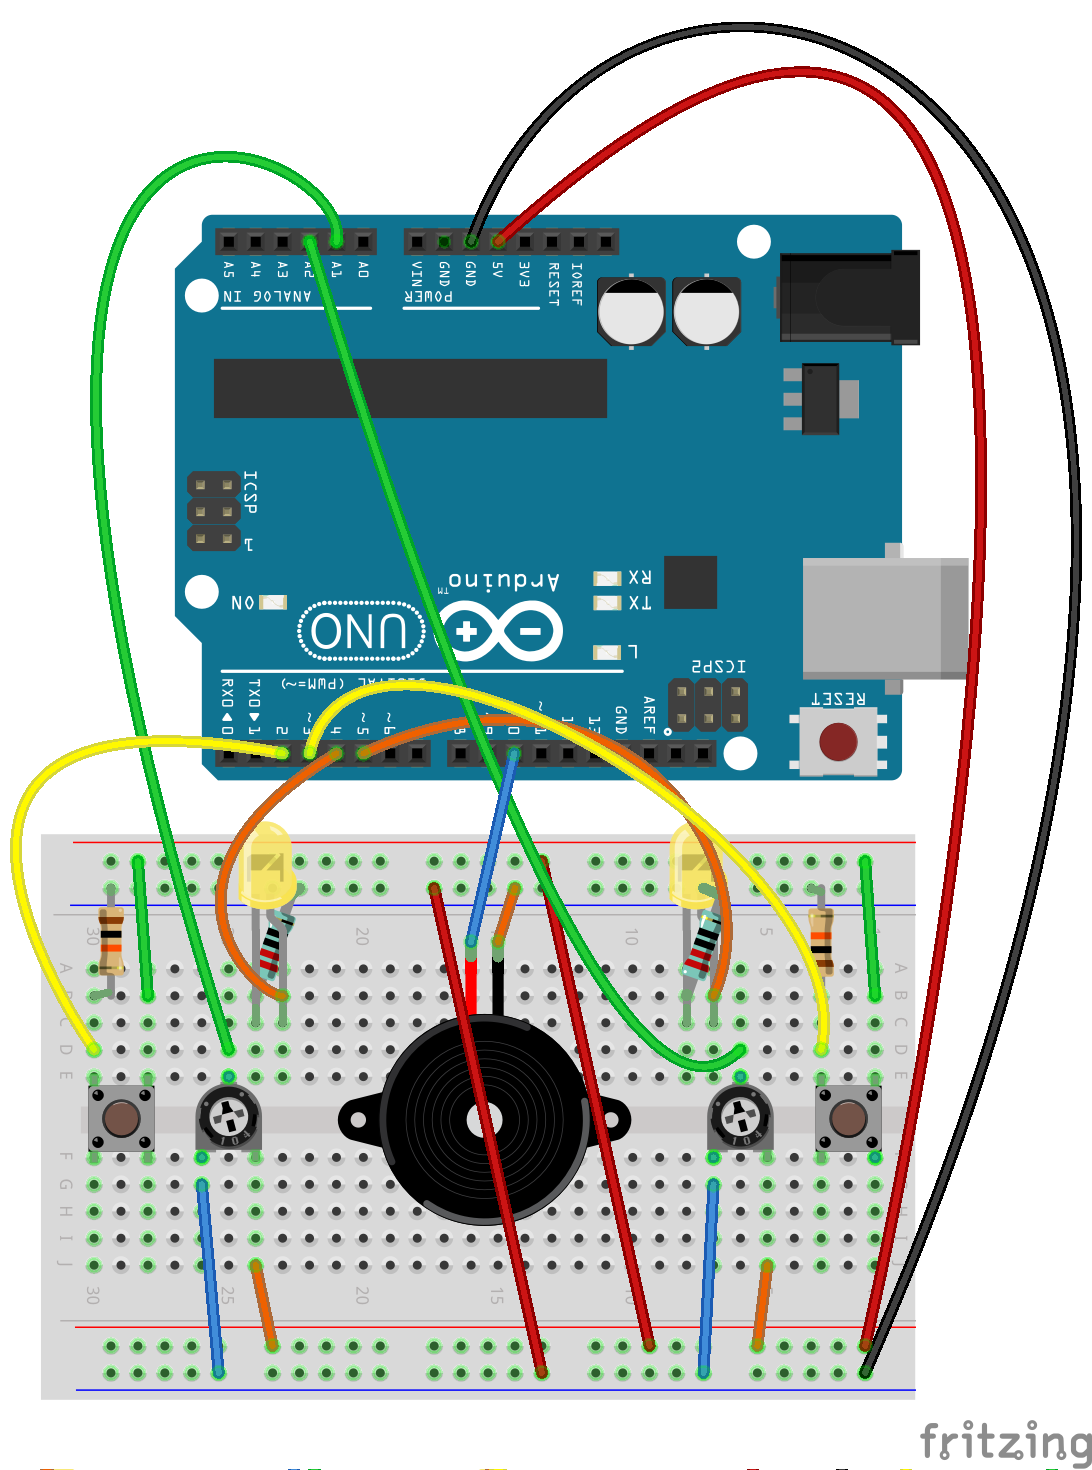
The Circuit
Fritzing Breadboard - Sounduino
Assembly
These instruction steps are used to assemble the circuit as shown above.
Step
Instructions
1
Ensure you have unplugged from power source and at least one end of USB cable is removed from either the UNO / computer.
2
The piezo will be slightly different to that shown in circuit above, the pins will be underneath. Gently place the two pins over sockets, making a note of the row column numbers on board, and then push piezo in.
3
Insert one end of the 20mm blue wire into the digital pin D10, and the other end into nearest board socket on one of the rows noted above.
4
Insert one end of the 5mm orange wire into a socket on the GND bus line, and the other end into the nearest board socket on the other row noted above.
Note: It is recommended not to use digital pins 0 and 1, due to them being used by USB serial communication.
The Code
View
Clone
Download
Arduino
What’s New
There have been no new sketch files added.
What’s Changed
Component Library
With the introduction of the piezo, code has been added to the Component Library.
File
Changes
component.h
Declaration of Piezo class added
component.cpp
Implementation of Piezo class added
Pronguino Library
The concept of a “console”, which has the Speaker and Controllers “attached”, this has been encapsulated in the Pronguino Library GameConsole class.
File
Changes
pronguino.h
Declaration of Speaker class added. Declaration of GameConsole class added
pronguino.cpp
Implementation of Speaker class added. Implementation of GameConsole class added
Pronguino Sketch
File
Changes
pronguino.ino
Added logic for GameConsole / Speaker. Added testing for GameConsole / Speaker
Testing
As previously, if you change TESTING to be true, upload the new code, you will see the same results in the serial monitor as in Servuino Testing, but will now also play sounds depending on the button(s) pressed as follows…
Sound
Button(s)
Ball hits wall
Left
Paddle hits ball
Right
Point scored
Left+Right
Troubleshooting
Check the following, as well as items in previous Troubleshooting guide….
Issue
Check
Nothing is working
Check Arduino is plugged in securely. Check red & black wires on board are secure. Check wires connecting bus lines.
No sound (when buttons pressed in test mode, or when events triggered such as ball hits wall etc)
Check piezo is firmly pushed in. Check the wires to D10 are connected ok. Check the wires to GND are ok. Check wires from buttons are ok.
Challenge: As I write the code, sometimes I have little ideas, notes to improve or fix things, see if you can tackle any that you see a the top of some of the code files, feel free to comment any questions you may have.
Processing
What’s New
After some experimentation with trying to create the correct tones / and also .wav playback using the standard Sound Library, I ended up using the Minim library, which simplified the process of .wav playback.
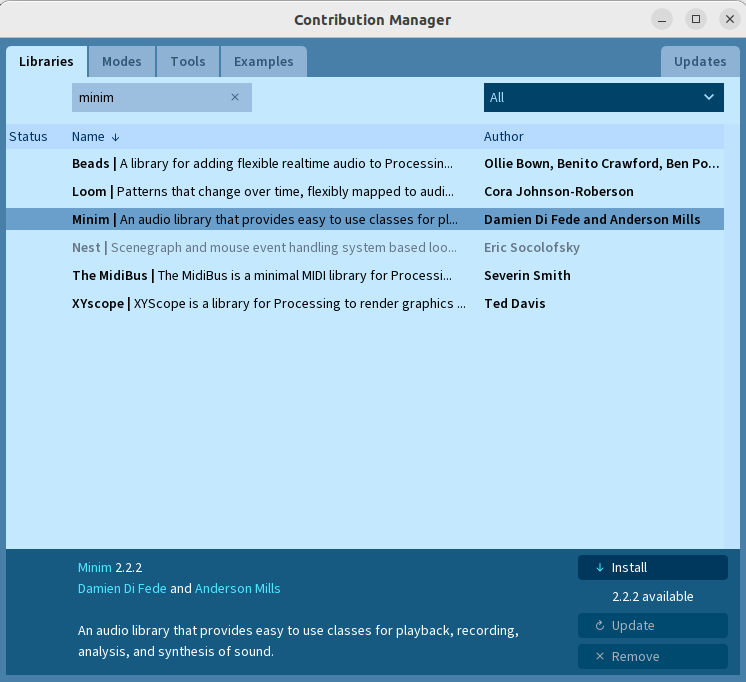
You will need to install the Minim library from the Processing IDE…
Sketch -> Import Library -> Manage Libraries… and search for “minim”
Manage Libraries - Minim
I have added a Speaker interface along with implementations for an ExternalSpeaker (Arduino) and InternalSpeaker (Computer), and also introduced the Console interface, with implementations for ExternalConsole and InternalConsole, to look after the controllers and speaker.
File
Description
data/WallSound.wav
Wave Audio file (Ball hits wall)
data/PaddleSound.wav
Wave Audio file (Paddle hits ball)
data/PointSound.wav
Wave Audio file (Point scored)
Console
Console interface. AbstractConsole implementation of abstract class. ConsoleFactory, determines which type of console to create. ExternalConsole implementation. InternalConsole implementation
Added position function to determine how/where to initially position paddle
Player
Use console to access controller
Pronguino
Some refactoring. Consumes Console class. Adds calls to sound methods in relevant places
Troubleshooting
Issue
Solution
The package “ddf” does not exist. You might be missing a library. No library found for ddf.minim
Make sure minim library has been installed via Sketch -> Import Library -> Manage Libraries…
Challenge: See if you can utilise the standard Sound library to either produce the tones or playback .wav files, I tried a few things .. SqrOsc, AudioSample and SoundFile, but couldn’t quite get them to work as I would expect, I may have missed something.
Play
Break time… Turn off testing mode, and re-upload…. volume up (if not using UNO) .. no change in controls…
Player
Up
Down
Pause/Resume/Serve
1
q
a
space
2
p
l
space
Rules
No functional changes to game, so rules are the same..
Rule
Description
Game Over
The first player to SCORE_MAX wins the game.
Opening Serve
PLAYER_ONE has the first service.
Player Misses
The same player serves.
Serve Direction
If the player serving has paddle in top half of surface, the direction will be down/left or right depending on player.
If the player serving has paddle in bottom half of surface, the direction will be up/left or right depending on player.
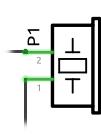
Piezo
A piezo sounder contains a piezo electric vibration plate within a moulded case. Sound is emitted when a voltage is applied and the piezo element inside the case vibrates. I won’t get into the details of how it works, just keeping simple for the context of this project.
Terminal 1 (\(T_1\)) connected to GND.
Terminal 2 (\(T_2\)) connected to digital pin D10.
The tone() function generates a square wave where the duty cycle is 50% (HIGH half the time, LOW half the time), at a given frequency in cycles per second (Hertz), for a specified duration in milliseconds to the required pin, in this case digital pin D10.
Learn: I find it important to get to know your components, and how they work, it helps when things don’t work as planned, look up the datasheets of the components to get data to be used to equations such as Ohms law to make sure you choose correctly.
Conclusion
A reasonably easy addition to this project. We have added a piezo buzzer to the circuit, used the tone() function to generate game sounds at the accurate frequencies from the original Pong game, and introduced a software fallback using the Minim library so that sounds are heard regardless of whether the Arduino is connected. Throughout these posts I have hopefully covered some of the very basics of a classic retro game — building the circuit, writing the software, and now bringing it to life with sound. I will probably be referring back to some posts or sections in future projects.
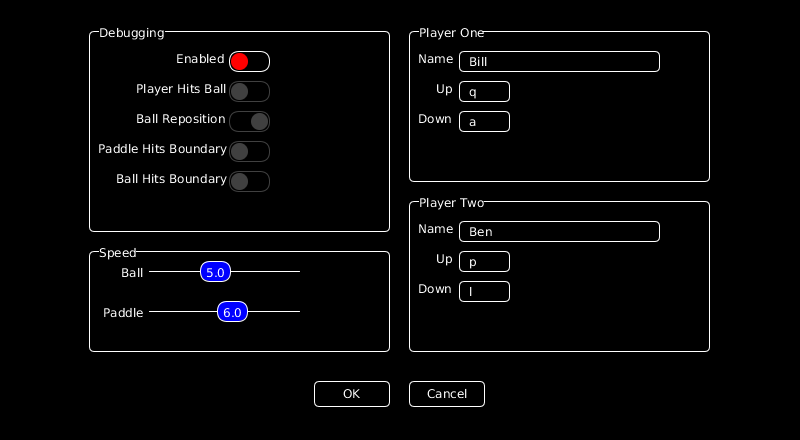
In this post, we are going to look at creating some form fields (with a dive into more object oriented methods), which have been used to create a menu and an options screen to change some of the settings.
Scope
Description
Processing
Creating a custom form controls library. Adding a Menu and an Options screen.
Building interactive form controls (Button, Input, Toggle, Slider, Frame) from scratch in Processing.
JSON File Handling
Reading and writing JSON files in Processing to persist settings between sessions.
Event Driven
Cascading mouse and keyboard events down through a class hierarchy.
Getting Started
Recommended
I recommend that you go through the previous posts for this project, although completing the Arduino part of the project is not essential.
The Code
View
Clone
Download
Processing
What’s New
The first thing I wanted to do in this stage was to move some of the game operations away from pronguino sketch into a new class Game. Also added a starting Menu, which allows us to change Options before we play.
Class
Description
Game
Class to encapsulate game operations. – Options – State – Begin – Pause – Resume
Form
Contains a number of form control classes – Frame – ToggleControl – InputControl – SliderControl – ButtonControl
Menu
Class to encapsulate menu operation – Play – Options – Exit – Status Message
What’s Changed
Most of the files have had a minor change due to moving Options into Game as a child property, below are the significant changes…
File
Changes
pronguino
Implemented new Game class. Implemented new Menu class Handle serial errors as status messages Added further mouse/keyboard events Added game events
Ball
Added applyOptions() method
Constants
Added new menu/option states Added new status message colours Add new colours constants
Debug
Cleared constructor
Options
Added form controls for options Add file handling for options file Add various methods/events
Paddle
Added applyOptions() method
Player
Added name property Added applyOptions() method Added serve() method
Scoreboard
Remove score property Added player property Display player.score on scoreboard Display player.name above scoreboard
Challenge: I have started adding TODO’s at top of some of the files, adding items I’d like to do, should do, or may do in the future. Sometimes when I am putting the code together for these posts it is easy to get carried away, but I have to find the cut-off point, so feel free to scan these and have a go yourself.
Play
The rules haven’t changed, keys and controls are still the same, now you can select Options from the Menu and change your name(s), set speed, or switch on debugging without changing the code!
Phorms
Forms
When a Processing application starts it runs setup() once, and then runs the code continuously in the loop draw() method, where the objects get displayed. With two new “forms” being added I have added some further state constants….
staticfinalintSTATE_MENU=5;// Game menu showingstaticfinalintSTATE_OPTIONS=6;// Game options showing
.. and these are used to determine what gets displayed during draw() method…
// Display ..switch(game.state){caseConstants.STATE_MENU:background(game.options.backgroundColour);menu.display();break;caseConstants.STATE_OPTIONS:background(game.options.backgroundColour);game.options.display();break;default:...// Game Objects...break;}
In preparation for adding controls onto the form, we need to know when certain events happen while the form is shown, these events can only be triggered in the main sketch (pronguino) and need to be cascaded down to the form … i.e.
.. and so the clicked() method is called in Menu class … it is in this method, the form still doesn’t know what has been clicked so checks each controls clicked() method to identify, and act accordingly.
If any of the controls used on a form have the validate() method and valid property implemented, a valid() method can be added to check all the relevant controls, which in this case is used to disable the OK button on the options form, to prevent invalid data being saved…
booleanvalid(){// Currently only input controls need validation ... for(intid=0;id<Constants.PLAYER_COUNT;id++){// ... this will return false if any of the controls are invalidif(!this.playerNameInputs[id].valid||!this.playerUpInputs[id].valid||!this.playerDownInputs[id].valid){returnfalse;}}// returns true on completion of loop, nothing invalidreturntrue;}
Controls
Processing is great for fast visual imagery and for games too, sometimes though you need to be able to interact with an application to adjust settings or enter data etc. There are a number of libraries available for such form controls, these would have been written in Java (which is what Processing language is based on).
As an exercise I decided to put some together using the “out-of-the-box” language, (will have a look at building own Java library another time) this allows me to further explore keyboard and mouse events, graphic/text combinations, and is also a good example to demonstrate some object-oriented methods.
Control
Description
Enabled
Disabled
Button
Simple push button.
Input
Simple text entry.
Toggle
Used for true/false values
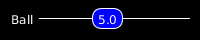
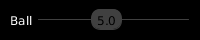
Slider
Choose value within a range by dragging slider along gauge.
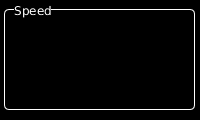
Frame
Used to group related controls / text.
N/A
In this section we will look into behavior and drawing of the controls, a further look into how they are put together will be covered more in Object-Orientation …
All the controls that extend the Control class will have the following properties… although not all are necessarily used…
Property
Type
Description
x
float
X co-ordinate
y
float
Y co-ordinate
w
float
Width
h
float
Height
label
String
Label
hasFocus
boolean
Has control got focus
disabled
boolean
Is control disabled
Also all the controls will share common functionality through these Control methods… although not all are necessarily called… and some may even override implementation…
Method
Return
Description
over()
boolean
Returns true if the mouse cursor is over the control.
display()
void
Draws the control.
clicked()
boolean
Returns true if the mouse button is clicked over the control.
Button
… the ButtonControl requires an additional property…
Property
Type
Description
caption
String
text displayed on button
.. and overrides the following method from Control …
Method
Return
Description
display()
void
Draws the button
After declaring the ButtonControl, we create it in the containing “form” class … in this case Options …
… the additional property is set in the controls constructor, the other properties are set by calling super(…) which calls the relevant constructor in the Control class.
classButtonControlextendsControl{...Stringcaption;...ButtonControl(floatx,floaty,floatw,floath,Stringcaption){// Call the constructor of the superclasssuper(x,y,w,h);// Sets own properties this.caption=caption;}...}
When the mouseClicked() event is triggered in the pronguino sketch, and the state is set to STATE_OPTIONS, the following method is called in the Options class…
.. it will do this by calling the over() method in the Control class, which will check to see if the mouseX and mouseY are within the boundary of the control, ignoring this check if control disabled…
When the button gets drawn, it uses the disabled property and over() method to determine which colours to use, one notable method being used here is textAlign() … it tells the following text() method how to interpret the x, y parameters .. in this case the CENTER point is in the middle of the text.
voiddisplay(){// Border colour depending on disabled state stroke(this.disabled?Constants.CONTROL_COLOUR_DISABLED:Constants.CONTROL_COLOUR_ENABLED);// Draw button, colour depending on whether mouse overfill(this.over()?Constants.CONTROL_COLOUR_ENABLED:Constants.CONTROL_COLOUR_BACKGROUND);rectMode(CORNER);rect(this.x,this.y,this.w,this.h,5);// Text, colour depending on disabled state / or mouse overfill(this.over()?Constants.CONTROL_COLOUR_BACKGROUND:this.disabled?Constants.CONTROL_COLOUR_DISABLED:Constants.CONTROL_COLOUR_ENABLED);textAlign(CENTER,CENTER);text(this.caption,this.x+(this.w/2),this.y+(this.h/2)-2);}
Input
… the InputControl requires additional properties…
Property
Type
Description
value
String
Value being input/edited
maxLength
int
Maximum length of value
valid
boolean
Is value a valid input
… and the following additional methods…
Method
Return
Description
value(String)
void
Sets the value property with a String
value(char)
void
Sets the value property with a String converted from a char
validate()
void
Sets the valid property
typed(char)
void
Event method called when key typed.
.. and overrides the following method from Control …
Method
Return
Description
display()
void
Draws the input control
After declaring the InputControl, in this case an array, we create it in the containing “form” class … in this case Options …
… with the exception of valid , … the additional properties are set in the controls constructor, the other properties are set by calling super(...) which calls the relevant constructor in the Control class.
When the mouseClicked() event is triggered in the pronguino sketch, and the state is set to STATE_OPTIONS, the following method is called in the Options class …
… which will then check with the following method in the Control class whether this control has been clicked() … however, note how this method is called slightly differently, we are not interested in the result of method, as we don’t have to do anything at this level.
Note: This is a good way to get around the fact that the following method implementations are not allowed i.e. two methods of the same name that have different return types i.e. …
void clicked() { … }
boolean clicked() { … }
.. as with ButtonControl the clicked() method in Control class will get called .. however, this time we are more interested in the hasFocus property …
When the keyTyped() event is triggered in the pronguino sketch, and the state is set to STATE_OPTIONS, the following method is called in the Options class…
.. which will then call typed(char typedKey) in the InputControl class, if the control has focus, adds typedKey to value, checking the maxLength, or if BACKSPACE is typed, removes last character from value, continuously checking if value is valid…
Using basic drawing methods, coloured based on disabled and valid properties, note when drawing the value, adds a _ afterwards when focused, acting as a cursor …
voiddisplay(){// Labelfill(Constants.CONTROL_COLOUR_LABEL);textAlign(RIGHT,TOP);text(this.label,this.x,this.y);// Borderif(this.valid){stroke(this.disabled?Constants.CONTROL_COLOUR_DISABLED:Constants.CONTROL_COLOUR_ENABLED);}else{stroke(Constants.CONTROL_COLOUR_INVALID);}// Input areafill(Constants.CONTROL_COLOUR_BACKGROUND);rectMode(CORNER);rect(this.x,this.y,this.w,this.h,5);// Valuefill(this.disabled?Constants.CONTROL_COLOUR_DISABLED:Constants.CONTROL_COLOUR_ENABLED);textAlign(LEFT,CENTER);// Add a 'cursor' after value if it has focustext(this.value+(this.hasFocus?'_':""),this.x+10,this.y+(this.h/2)-1);}
Challenge: Have a go at either amending or extending the InputControl, to allow only number relating characters i.e. 0-9, ‘.’, ‘-‘ etc, extending is probably the better option, then you don’t ‘break’ InputControl .. just create a new one called say ‘NumberInputControl’ ? You could add a FrameControl titled ‘Net’ and put all the net related options here ?
Toggle
… the ToggleControl requires an additional property…
Property
Type
Description
value
boolean
On / Off
… and the following additional method…
Method
Return
Description
value(boolean)
void
Sets the value property with a boolean
.. and overrides the following methods from Control …
Method
Return
Description
clicked()
boolean
Returns true if the mouse button is clicked over the control.
display()
void
Draws the toggle control
After declaring the ToggleControl, we create it in the containing “form” class … in this case Options…
… the additional property is set in the controls constructor, the other properties are set by calling super(...) which calls the relevant constructor in the Control class.
… a setter method value(...) is used to set the value …
voidvalue(booleanvalue){this.value=value;}
When the mouseClicked() event is triggered in the pronguino sketch, and the state is set to STATE_OPTIONS, the following method is called in the Options class…
.. when the clicked() method in the ToggleControl class gets called .. first it checks with the superclass to see if control has been clicked, if it has, it uses the logical NOT operator to invert the current boolean value.
… the additional properties are set in the controls constructor, the other properties are set by calling super(...) which calls the relevant constructor in the Control class.
… a setter method value(…) is used to set the value …
voidvalue(floatvalue){this.value=value;}
When the mousePressed(), mouseReleased() or mouseDragged() events are triggered in the pronguino sketch, and the state is set to STATE_OPTIONS, the following methods are called in the Options class…
.. which will then call the pressed(), released() or dragged() respectively in the SliderControl class … as it its the child class SliderButtonControl that is more interested in these events happening the call is passed on…
The SliderButtonControl is a child class of SliderControl, and only used by its parent to manage the buttons behaviour … it has no use outside of this …
classSliderControlextendsControl{privateclassSliderButtonControlextendsControl{// So we can access parent propertiesSliderControlparent;...}...}
… the SliderButtonControl requires additional properties …
Property
Type
Description
grabbed
boolean
Set when mouse button pressed or released.
parent
SliderControl
Access to parents properties i.e. value, x, y etc.
… and the following additional methods …
Method
Returns
Description
pressed()
void
Event method called when mouse button pressed.
released()
void
Event method called when mouse button released.
dragged()
void
Event method called when mouse button pressed and dragged.
.. and overrides the following methods from Control …
Method
Returns
Description
over()
boolean
True if mouse cursor over control.
display()
void
Draws the slider control
After declaring the SliderButtonControl, we create it in its parent class … SliderControl …
… the additional properties are set in the controls constructor, the other properties are set by calling super(...) which calls the relevant constructor in the Control class.
.. when the pressed() method in the SliderButtonControl class gets called .. the grabbed flag gets set according to result of over() …
voidpressed(){this.grabbed=this.over();}
.. when the released() method in the SliderButtonControl class gets called .. the grabbed flag gets set to false …
voidreleased(){this.grabbed=false;}
.. when the dragged() method in the SliderButtonControl class gets called .. the x co-ord of the button gets continuously calculated by keeping the mouseX value within the bounds of its parent, using the constrain() method, and then calculates the new value for SliderControl, based on the new x co-ord …
Challenge: Have a go at creating a new, more specific control to adjust the size of the ball, you could create a new file to add this into, called, say… GameForm, keeping Form to be used for generic type controls. You could call this control something like BallSliderControl, that extends SliderControl (also adding BallSliderButtonControl, which would be the ball itself), adding additional properties such as ballRadius, and overriding methods such as over() and display(), where, instead of showing value, change the size of ‘ball’ etc. You could also do something similar with the the paddleHeight, drawing the paddle as the ‘gauge’ ?
Frame
The FrameControl requires an additional property…
Property
Type
Description
title
String
Title text displayed on the frame.
… no additional methods are required, just the following overridden method…
Method
Return
Description
display()
void
Draws the frame control
After declaring the FrameControl, we create it in the containing “form” class … in this case Options …
… the additional property is set in the controls constructor, the other properties are set by calling super(...) which calls the relevant constructor in the Control class.
.. the display method simply draws a rounded rectangle, note when drawing the title, a background coloured rectangle is drawn first, based on the width of the title in pixels, based on the current font size using the method textWidth().
voiddisplay(){// Borderstroke(Constants.CONTROL_COLOUR_FRAME);noFill();rectMode(CORNER);rect(this.x,this.y,this.w,this.h,5);// Title backgroundnoStroke();fill(Constants.CONTROL_COLOUR_BACKGROUND);rect(this.x+10,this.y-10,textWidth(this.title)+2,20);// Title fill(Constants.CONTROL_COLOUR_FRAME);textAlign(LEFT,CENTER);text(this.title,this.x+10,this.y);}
Object-Orientation
Object-Orientation is a huge subject… and definitely not completely covered here, however, will cover some of the concepts within the context of this project.
Object
An object is an entity that has state and behaviour, in this project for example we have the following objects along with examples of some of their state and behaviour…
Object
State
Behaviour
Ball
Colour Speed
can move. can bounce.
Game
State In play ?
can pause. can resume.
Input Control
Value Has focus ?
can be clicked. can be typed in.
.. each one of these is an instance of a class…
Class
A class is basically a blueprint from which an object is instantiated… each class can include fields, methods and constructors, these are some examples of classes used in this project…
Class
Fields
Methods
Constructor
Player
score name
serve()
Player(index) {…}
Paddle
player speed
move()
Paddle(Player player) {…}
Note: I have used the term ‘fields’, however there are other terms used with different meaning depending on the context i.e. properties, attributes etc, as Processing ignores scoping keywords such as private and public etc, any field declared in a class will be exposed as properties anyway.
.. in most cases objects are instantiated with the new keyword… so for players to be created…
The aim of encapsulation is to prevent some internal fields of the object being changed directly by “hiding” them, and then provide (or not provide, as they maybe fields that are just used internally) the means to access them via ‘getter’ and ‘setter’ methods.
As mentioned in the note above, Processing ignores scoping keywords such as private and public, so we can not really implement encapsulation, however, I will still go through some examples, as I am hoping to convert the form controls into a Java library, and this is where encapsulation will really matter.
A good example to show is the InputControl class …
If this class was to be written in Java, it should look something like this …
classInputControlextendsControl{privateStringvalue;// Hide the value, preventing access directly...privatebooleanvalid;// This should only be set internally...// ConstructorInputControl(floatx,floaty,floatw,floath,Stringlabel,intmaxLength,Stringvalue){...this.setValue(value);}...// Setter method for valuepublicvoidsetValue(Stringvalue){this.value=value;this.validate();}// Getter method for valuepublicStringgetValue(){returnthis.value;}...// Getter method for validpublicbooleanisValid(){returnthis.valid;}// Validation, only to be called internallyprivatevoidvalidate(){this.valid=(this.value.length()>0);}
Abstraction
Abstraction is a bit like saying, here is what you have got to do, I don’t care how you’re going to do it, but I might do some of it for you.
In this project that plays out in two layers. The IControl interface says “here is what you have got to do” — any control must have over(), clicked() and display(). The Control abstract class then says “I’ll do some of it for you” — it implements over() and clicked() with common behaviour, but leaves display() as abstract, because only the specific control knows how it should be drawn.
Interface
An interface is in essence a contract for any class that implements it has to follow, in this project we have the following interface…
.. so any class that implements this interface, has to create each method, whether it be abstract or non-abstract…
abstractclassControlimplementsIControl{...}
It may be that in the future, I added some kind of read-only or visual control that doesn’t need over() and clicked(), just display() … I could then split the above interface to something like …
.. and the classes that implemented these would look like this …
// A visual only controlabstractclassControlimplementsIControl{...}// A Clickable control, but also needs to be a visual oneabstractclassClickableControlimplementsIControl,IClickableControl{...}
.. using interfaces is useful for expanding on classes without breaking existing code, and also if we were to have had a method that needs to do something with any of our controls, we could use …
voidsomeMethod(IControlsomeControl){...}
… which would accept as an argument any object that was created from a class that implements IControl.
Abstract Class
An abstract class is basically creating our base (or superclass) class from which other classes will be derived from, in the case of this project, we have the Control class, which is….
defining the common fields (i.e. x, y, w, h).
defining and implementing non-abstract methods with common functionality (i.e. over, clicked)
defining abstract method, that needs to be implemented by derived classes (i.e. display)
Abstract classes cannot be instantiated, so doing something like this would not be allowed …
Controlcontrol=newControl(...);
Inheritance
Inheritance is where one class extends another, inheriting all of its properties and methods, these are the various types of inheritance…
Single Inheritance
There isn’t an example of single inheritance in this project, where one class is extended only once by another class.
Multiple Inheritance
Processing or Java does not support multiple inheritance, where one class can extend two or more other classes.
Hierarchical Inheritance
Hierarchical inheritance, is where many classes are derived from the same class, in the Forms file, all of the controls here are extended from the Control class.
Below is a simple example, showing the relevant code of the ButtonControl class, in this case all of the properties will be available, the over() and clicked() methods do not need to be implemented, but their functionality is inherited from the Control class, the only code that needs to be added is any additional properties of its own i.e. caption, and to implement the abstract method display()..
classButtonControlextendsControl{// Extra property required for button controlStringcaption;...// Implements the abstract method defined in Control voiddisplay(){...// Code to draw button...}}
Multilevel Inheritance
Multilevel inheritance is where a class is derived from another already derived class, although there are no examples of this type, a challenge was set earlier in post that would use this type of inheritance, here is a bit of a spoiler …
classBallSliderControlextendsSliderControl{...}
Polymorphism
Polymorphism, the word, is Greek, which translates roughly to “multiple or many forms”, so in the context of object-orientation we are transforming a class into different (but related) classes by changing the underlying behaviour of its methods. There are two types of polymorphism…
Compile Time
Compile time polymorphism is achieved using overloading, below, shows two overloaded constructors for the Control class, this allows any controls extending this to implement in two different ways, in this example a control with a label, and a control without…
..so in the case of the ToggleControl, for example, the constructor calls super (…) which uses the relevant constructor of Control class (the superclass), and then sets its own properties…
.. and in the case of the FrameControl, for example, which doesn’t display a label, it has it’s own property title, it only requires the use of x, y, w and h, which get set by calling super(...) which uses the relevant constructor of Control …
As well as constructors other methods can be overloaded, as in this case with the InputControl, we have setValue( ... ), the first overload accepts a String, and then validates, the second one allows a char to be passed in, and calls the other with char converted…
Run time polymorphism is achieved by overriding methods, where a subclass provides the specific implementation of a method declared in its superclass.
One example is in the SliderButtonControl, where the over() method needs to do the check for mouse over a little different from what was in Control class…
booleanover(){// code to do something different than what was implemented on Control}
… another example is in the ToggleControl, with clicked() , however, this time instead of replacing the implementation completely, it checks with the parent method first using super.clicked(), and continues with setting the value if true …
.. and finally, with all the classes derived from Control, they are to be drawn differently by overriding the method display(), which in the Control class had no implementation at all …
voiddisplay(){// draw the specific control here}
File Handling (JSON)
Up until now all the options of the game have been hard coded into the Options class constructor, and we now have form to change some of them, but we need to keep these settings for when we close game and play again next time.
Below is the contents of options.json file located in the /data folder, it is formatted using JSON (JavaScript Object Notation)…
Ok, so that was quite a chunky post, but hopefully quite a useful one. We have gone from building a set of interactive form controls from scratch, to wiring them up with mouse and keyboard events, all the way through to persisting settings with JSON file handling.
Along the way the project has been a good vehicle for exploring some core object-orientation concepts — encapsulation keeping data safe behind setter methods, abstraction through interfaces and abstract classes defining contracts for our controls, inheritance letting all the controls share common behaviour from the Control superclass, and polymorphism allowing each control to override and extend that behaviour in its own way.
It is also worth noting that although Processing does not enforce access modifiers like private and public, writing the code as if it did — using getter and setter methods, keeping validation internal — is good practice and will matter if the form controls ever get converted into a proper Java library.
What next? There is something missing, something that all video games should have… Next up … Sounduino.
Time to add a few more components to the circuit, add some additional functionality and have a bit more of a tidy up in the code, adding game state and “event” driven in areas. Also introducing two-way communications between PC and Arduino UNO and building a code library.
Currently the game just starts automatically and the ball moving part-randomly at the beginning, so adding the ability for user to control the serve, pause and resume the game.
Scope
Description
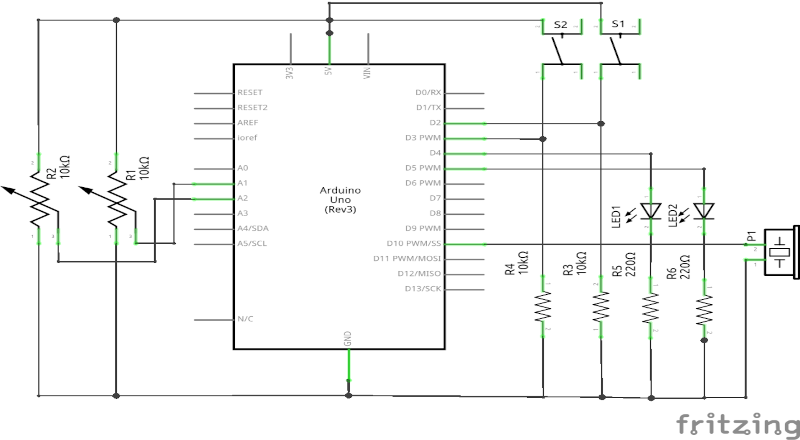
Circuit
Adding two tactile switches and two LEDs to the existing circuit.
Arduino
Building a component library. Sending and receiving data over serial.
Processing
Building a project library. Sending and receiving data over serial.
Game
Adding game state, event-driven actions, player-controlled serve, pause and resume.
Learning
Description
Pull-down Resistors
How pull-down resistors are used to guarantee a stable LOW signal on a digital input pin.
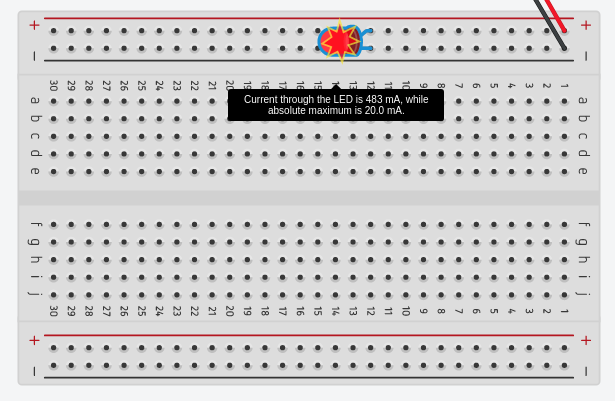
Fixed Resistors & LEDs
How to calculate the correct resistor value for an LED using Ohm’s Law and the LED datasheet.
Bitwise Operations
How to pack and unpack multiple values into a single byte for serial communication.
Serial Communication
How two-way communication works between the Arduino UNO and Processing over serial.
Code Libraries
How to structure reusable code into libraries in both Arduino and Processing.
Getting Started
Recommended
I recommend reading through the Pronguino post, as we are building circuit on top of the result of this.
Components
All the components that you need listed here are in the Arduino Starter Kit, as mentioned above, this is being built on top of previously built circuit, see existing components list, as well as the following…
Component
Quantity
Button (Tactile Switch)
2
Resistor 10k Ω
2
Yellow LED
2
Resistor 220 Ω
2
10mm Green wire
2
100mm Yellow wire
2
75mm Orange wire
2
50mm Red wire
2
Note: I have been specific on the length in particular on the above wires, mainly for the smaller ones that are used just on the breadboard, so they are as flat as possible.
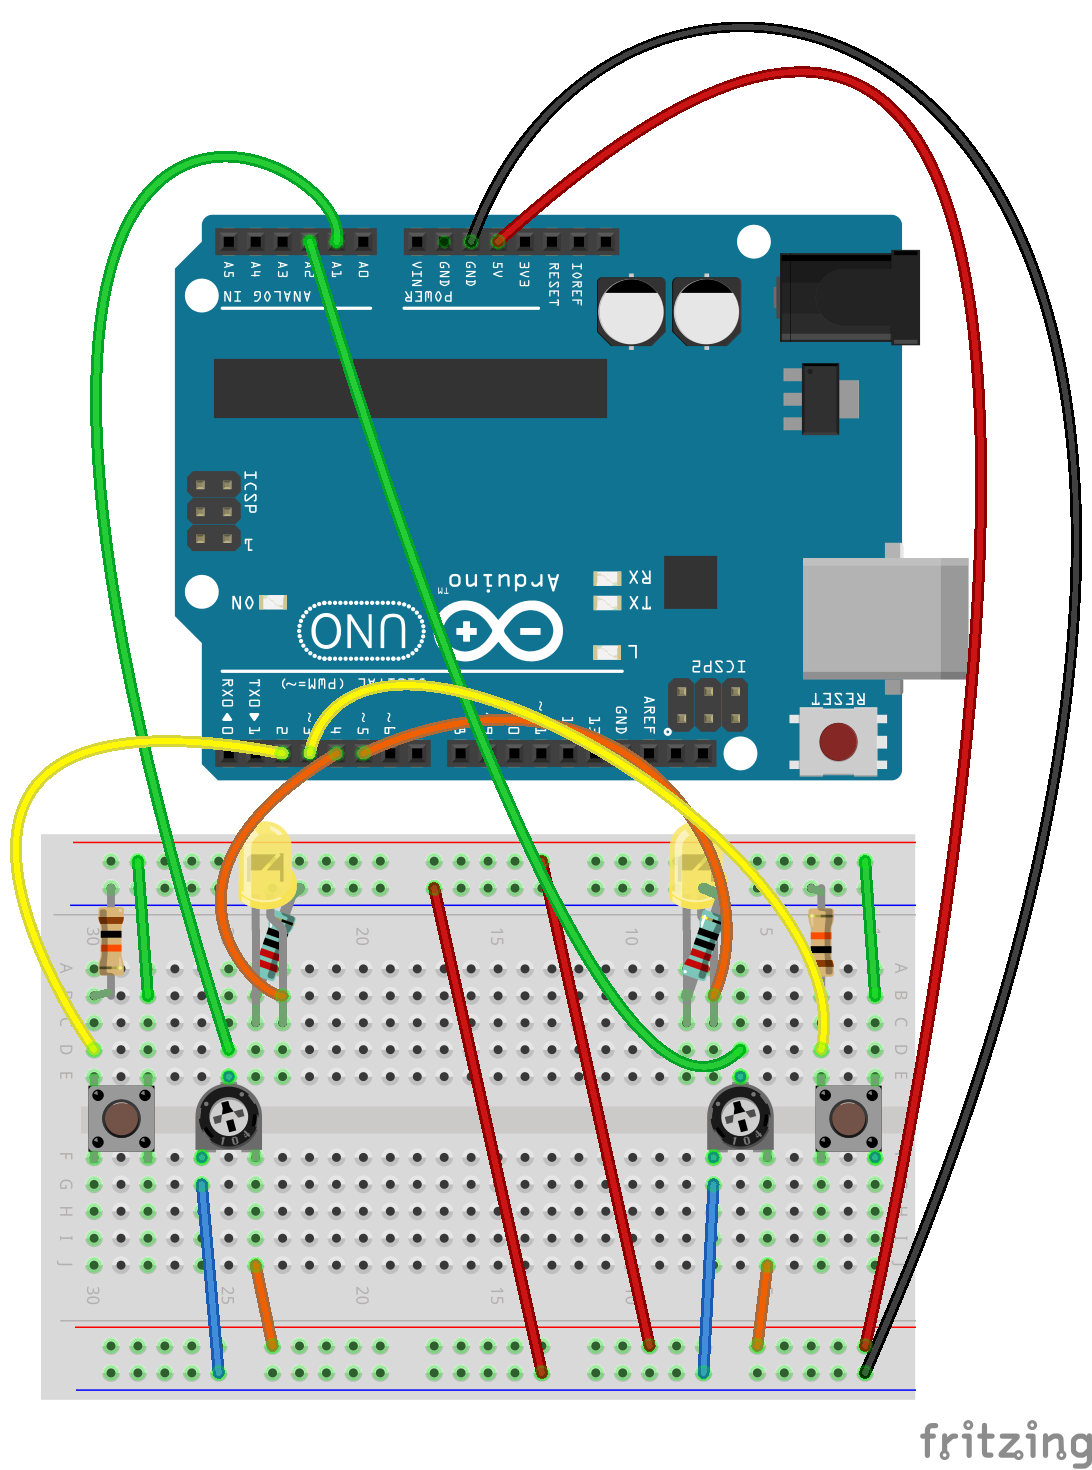
The Circuit
Fritzing Breadboard - Servuino
Assembly
These instruction steps are used to assemble the circuit as shown above, a little more tricky than previous, you need a steady hand.
Step
Instructions
1
Ensure you have unplugged from power source and at least one end of USB cable is removed from either the UNO / computer.
2
Take each of the 50mm red wires and connect the two bus lines + to + and – to – respectively.
3
The switches that come with the kit (at time of publishing this), are best to straddle the centre of the breadboard, so place one on the left of the board next to the potentiometer. Only one orientation of the button should fit. Place the other on the right hand side. Make sure you press them in firmly, so they don’t wobble.
4
Take one of the 10k Ω resistors, place one pin into a board socket aligned with the top left pin of switch on left (leaving at least one socket between), and the other pin into a – socket on the top bus line. Repeat for the other 10k Ω resistor for right side switch.
5
Insert one end of a 100mm yellow wire into a board socket in between the switch and resistor placed in previous step, and the other end into digital pin D2. Repeat for the other 100mm yellow wire for right side switch, placing the other end of wire into digital pin D3.
6
Insert one end of a 10mm green wire into a board socket aligned with the top right pin of the switch on left, and the other end into a + socket on the top bus line. Repeat for the other 10mm green wire for right side switch.
7
Identify two clear strips of board sockets, just to the right of the left side potentiometer, and place one of the LEDs across these strips around the middle, I have put the long pin (anode) of the LED to the right in this case, just remember which. Repeat for the right side of board with other LED.
8
Take one of the 220 Ω resistors, and place one pin into a socket aligned with the left pin of LED (cathode), and the other into a – socket on the bus line. Repeat for other 220 Ω resistor on other side of board.
9
Insert one end of a 75mm orange wire into a board socket aligned with the right pin (anode) of the LED on left, and the other end into digital pin D4. Repeat for the other 75mm orange wire for right side LED, placing the other end of wire into digital pin D5.
Note: It is recommended not to use digital pins 0 and 1, due to them being used by USB serial communication.
The Code
View
Clone
Download
Arduino
What’s New
Component Library
As some new components have been introduced, I have added a low level library containing classes to encapsulate basic components called Component.
File
Description
Component.ino
Dummy sketch for library.
Component.h
Header file for Component library.
Component.cpp
C++ implementation of Component.h – Potentiometer class – Switch class – LED class
Pronguino Library
… also a new project specific library called Pronguino, that utilizes the Component library, for example, to convert raw data from components into usable data i.e. controller value.
File
Description
Pronguino.ino
Dummy sketch for library
Pronguino.h
Header file for Pronguino library (replaces Controller.h)
Pronguino.cpp
C++ implementation of Pronguino.h (replaces Controller.cpp) – Controller class
What’s Changed
Pronguino Sketch
Creating libraries has a number of benefits, such as, being able to re-use code, keep the main sketch a lot less cluttered, easier to read.
Within the code download, there is a folder called arduino/libraries, inside there are two folders called Component and Pronguino, copy these to the libraries folder in the location specified from IDE menu option … File -> Preferences -> Settings -> Sketchbook location ….
Now, you should only need to open the Pronguino sketch and compile, you may have to restart IDE. You won’t see these libraries in the Library Manager as they are just local. maybe in time I will publish a library, and talk you through that.
File
Changes
pronguino.ino
Uses new Pronguino library. Refactored slightly. Only writes serial data on change of values
Testing
As previously, if you change TESTING to be true, upload the new code, the setup() will call function resultsHeader() to print some headings, and will also read the initial values of the two controllers, and the state of the buttons, so if you turn both potentiometers to the left, clear the serial monitor, and press the reset button on UNO .. you should see the following result.
The loop() function is now continuously reading from each controller and button, checking for a change in any of the values, when a change is detected, resultsDetail() will print the values, , note the bold values that change, so …
Note: So the they can be tested and make sure wired up OK, the relevant LED will light up when pressing either of the buttons, this only happens when in test mode.
Troubleshooting
A little more fiddly this circuit, a few more components and wires to check ..
Issue
Check
Nothing is working
Check Arduino is plugged in securely. Check red & black wires on board are secure. Check wires connecting bus lines.
Random data in Serial Monitor (without change potentiometer)
Check potentiometers are firmly pushed in. Check the data wires are securely connected. Check buttons are firmly pushed in along with data wires and resistors.
LED not emitting light (when button pressed in test mode, or when player waiting to serve)
Check LEDs and resistors firmly pushed in. Check the data wires are connected.
Processing
In line with the Arduino code above, have add Button and Indicator classes to encapsulate the state, had quite a bit of a tidy up in the code, made adjustments for the lower range of values coming in from the controller, and removed the previous random start position / direction of ball, putting the player in control…
What’s New
File
Description
Button
Contains a new class Button, which encapsulates the state received from the switches.
Indicator
Contains a new class Indicator, which encapsulates the setting of state of the LEDs.
What’s Changed
File
Changes
Ball
Removed random start direction.
Constants
Added more constants for state, button, indicator and data bit masks.
Controller
Added Button as a child. Added Indicator as a child. Added connected flag. Refactoring
Debug
Rename of a flag
Functions
Use of data bit mask constants. New function to create outgoing data
Paddle
Added speed factor.
Player
Removed “wrapper” methods for child objects. Refactoring
pronguino
Added game state (i.e. paused, ended etc ..). Added game actions (i.e. pause, resume etc ..). Added new event methods i.e. buttonPressed. Refactoring
Challenge: As I was finishing the code for this stage of project, I saw a need for another class to help keep things tidy … Game … have a go at creating and implementing this class, maybe include state ? … and the actions ?
Play
Break time … Turn off testing mode, and re-upload …. when player misses the other player serves next, while the player has the ball the relevant LED should light, and will turn off when they serve, either using the keyboard or “controller”…
Player
Up
Down
Pause/Resume/Serve
1
q
a
space
2
p
l
space
Key Controls
Rules
As this project progresses, these will be reviewed and improved to get closer to the real rules of ping pong. The game rules that have been implemented so far, are as follows…
Rule
Description
Game Over
The first player to SCORE_MAX wins the game.
Opening Serve
PLAYER_ONE has the first service.
Player Misses
The other player serves.
Serve Direction
If the player serving has paddle in top half of surface, the direction will be down/left or right depending on player.
If the player serving has paddle in bottom half of surface, the direction will be up/left or right depending on player.
Fixed Resistors
At a basic level, resistors are used in circuits to reduce current flow, in the context of this circuit, I will describe the use of the fixed resistors along with switches and LEDs below.
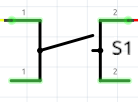
Switches
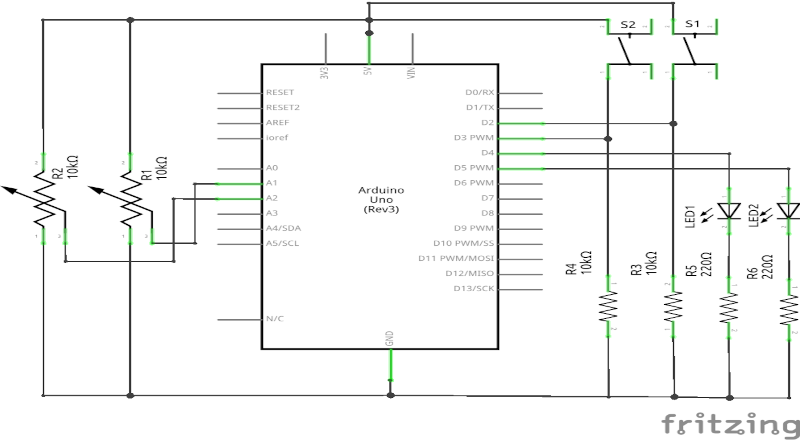
The switches used in this circuit are momentary switches, so they close the circuit when pressed, and open circuit when released, for example, S1 is connected as follows…
Terminal 1 ($T_1$) connected to digital pin D2 and also, through a 10k Ω pull-down resistor to GND.
Terminal 2 ($T_2$) connected to 5V
The digital pins, when mode is set to INPUT, will either read as HIGH (~5V), or LOW (~0V).
When the pins are not connected to anything there is a small input leakage current, looking at the datasheet on page 259, both the low/high max current is $1\,\mu A\,(0.001\,mA)$, and the input would float between HIGH and LOW.
In order to guarantee a small enough voltage, say $0.01V$ to register as LOW when the switch is unpressed, we need to connect the pin to GND through a resistor known as a pull-down.
Using Ohm’s Law, we would calculate the required resistance with the following equation…
\[R = \frac{V}{I}\]
… so, given the values from above…
\[R = \frac{0.01V}{0.001mA}\]
.. would give a result of…
\[R = 10k\Omega\]
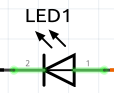
LEDs
An LED (Light-Emitting Diode) is a component that emits light when current flows through it, also electricity only flows in one direction, in this circuit we have, for example, LED1 wired as follows…
Terminal 1 ($T_1$) connected to digital pin D4
Terminal 2 ($T_2$) connected to GND through a $220Ω$ resistor.
Digital pin D4 has been configured as OUTPUT, when this pin is set to HIGH, the LED will light up.
So the LED doesn’t burn out too quickly, we need to put a resistor in series with LED, reduce the current, to calculate the Ohm value of this resistor, we would use the formula…
\[R = (V_s - V_f) \times \frac{N}{I_f}\]
… where…
Symbol
Description
Value
$V_s$
Voltage Supply
\(5V\)
$V_f$
Forward Voltage (LED)
\(2.1V\) *
$N$
No. of LEDS
1
$I_f$
Forward Current (LED)
\(0.02A\) (\(20mA\)) *
* These values where take from the datasheet, using the typical forward voltage, and test conditions.
… so…
\[R = (5 - 2.1) \times \frac{1}{0.02}\]
… resulting in…
\[R = 145\Omega\]
… but, there is no single 145 Ω standard value resistor, the nearest value would be 150 Ω*, however, the smallest value resistor in the Starter Kit is 220 Ω, so as we are using this, the forward current will be calculated as..
* Based on similar resistors available at ±5% tolerance in datasheet
\[I_f = \frac{(5 - 2.1)}{220}\]
… giving…
\[I_f = 0.013A = 13mA\]
.. which is more than enough to light it up, which is worth bearing in mind with LEDs, even though the datasheet states a maximum of \(30mA\), you don’t really need it that bright for most applications.
Learn: I find it important to get to know your components, and how they work, it helps when things don’t work as planned, look up the datasheets of the components to get data to be used to equations such as Ohms law to make sure you choose correctly.
Bitwise Operations
The serial port transmits one byte (8 bits) at a time. Previously, the full byte was used to carry just one controller value. Now that we also need to carry a button state alongside the controller value, and need to do this for two players, we need to be smarter about how we pack data into that single byte.
The solution is to split the byte into two nibbles (4 bits each) — one for each player — and within each nibble, use the lower 3 bits for the controller value (giving a range of 0–7) and the 4th (most significant) bit for the button state (0 or 1).
7
6
5
4
3
2
1
0
Nibble
highNibble — Player 1
lowNibble — Player 2
Field
button
value (0–7)
button
value (0–7)
Example
1
0
0
1
0
0
0
1
Example: Player 1 — value 1, button pressed (1). Player 2 — value 1, button not pressed (0). data = 10010001 = 0x91 = 145
Bitwise operators are used to pack this data on the Arduino side, and unpack it on the Processing side.
Arduino
This code is a snippet from the createData(...) function in the main pronguino.ino file, it receives the values read from the potentiometers and states from the switches, and creates the data to be written to the serial port…
// Convert to nibblesbytehighNibble=(byte)(controllerValue1|buttonState1<<3)<<4;bytelowNibble=(byte)controllerValue2|buttonState2<<3;// Combine the two nibbles to make a bytebytedata=highNibble|lowNibble;
.. so, using the example from the bit-map above — Player 1 controller at minimum (value 1), left button pressed (1), Player 2 controller at minimum (value 1), right button not pressed (0) — the function is given …
Binary
Hexadecimal
Decimal
controllerValue1
00000001
0x01
1
controllerValue2
00000001
0x01
1
buttonState1
00000001
0x01
1
buttonState2
00000000
0x00
0
.. to calculate the highNibble, first we need to left shift the buttonState1 3 positions ..
Binary
Hexadecimal
Decimal
buttonState1
00000001
0x01
1
<< 3
result
00001000
0x08
8
.. and then bitwise OR result and controllerValue1 …
Binary
Hexadecimal
Decimal
result
00001000
0x08
8
| controllerValue1
00000001
0x01
1
result
00001001
0x09
9
.. then left shift four bits …
Binary
Hexadecimal
Decimal
result
00001001
0x09
9
<< 4
highNibble
10010000
0x90
144
… in this example the controllerValue2 is 1, and button is not pressed, so, for simplicity lowNibble would be just 1, and to calculate data to send …
Binary
Hexadecimal
Decimal
lowNibble
00000001
0x01
1
| highNibble
10010000
0x90
144
data
10010001
0x91
145
In the main pronguino.ino file, inside function serialEvent(), which will get called when any data received on serial port, there is the following snippet of code…
// Read DatabytedataIn=(byte)Serial.read();// Get Stateintstate=bitRead(dataIn,0);// Get Indexintindex=bitRead(dataIn,1);
.. thinking I was going to write a few lines of code to extract the bits needed to identify LED state, and player index, a quick scan of the language reference revealed a function called bitRead, which does the job for me.
Learn: Sometimes you might find yourself writing lines and lines of code when there is function or method already available. Always worth a check in reference if you start thinking there must be a better way of doing this.
Processing
Have made some changes to the serialEvent() function in main Pronguino file, so it can now breakdown the data received from the UNO further, getting the highNibble and lowNibble haven’t changed…
...// Set the value of each controller (first 3 bits of nibble ... 0-7)players[Constants.PLAYER_ONE].controller.setValue(highNibble&Constants.DATA_BITS_VALUE);players[Constants.PLAYER_TWO].controller.setValue(lowNibble&Constants.DATA_BITS_VALUE);// Set the state of each controllers button (4th or most significant bit of each nibble ... 0-1)players[Constants.PLAYER_ONE].controller.button.setState((highNibble&Constants.DATA_BITS_STATE)>>3);players[Constants.PLAYER_TWO].controller.button.setState((lowNibble&Constants.DATA_BITS_STATE)>>3);...
.. and by adding a few more constants for bit masks…
...staticfinalintDATA_BITS_VALUE=0x07;// Bit mask used to extract value of controller from nibble (00000111)staticfinalintDATA_BITS_STATE=0x08;// Bit mask used to extract state of button from nibble (00001000)...
.. we will go through just the highNibble, as the lowNibble follows the same process — using data byte 0x91 from the example above, the highNibble is 0x09 shifted left 4 bits, which gives 0x90 (10010000), so …
Binary
Hexadecimal
Decimal
highNibble
00001011
0x0B
11
.. to get the value of the controller …
Binary
Hexadecimal
Decimal
highNibble
00001011
0x0B
11
& DATA_BITS_VALUE
00000111
0x07
7
value
00000011
0x03
3
.. and to get the button state, first use mask to get bit value…
Binary
Hexadecimal
Decimal
highNibble
00001011
0x0B
11
& DATA_BITS_STATE
00001000
0x08
8
result
00001000
0x08
8
.. and then right shift three places …
Binary
Hexadecimal
Decimal
result
00001000
0x08
8
>> 3
state
00000001
0x01
1
When a player misses the ball, the ball is “given” to other player to serve, at this point we send a data byte to the UNO, to indicate which LED to light up, this data is calculated and returned from the following function in Functions file..
… so, for example, if Player 2 misses (index 1) and their LED should light up (state 1) …
Binary
Hexadecimal
Decimal
playerIndex
00000001
0x01
1
indicatorState
00000001
0x01
1
… first the playerIndex is shift 1 bit to left …
Binary
Hexadecimal
Decimal
playerIndex
00000001
0x01
1
<< 1
result
00000010
0x02
2
.. then bitwise OR result with indicatorState …
Binary
Hexadecimal
Decimal
result
00000010
0x02
2
| indicatorState
00000001
0x01
1
data
00000011
0x03
3
Challenge: Create some more generic functions, a new functions file, say, Bitwise, similar to the Arduino bitwise functions i.e. bitSet(), lowByte(), to replace those in the Functions file, maybe highNibble(), lowNibble() ?
Conclusion
Had a bit of a shake up in the code, learned about some new functions, and new components, added some libraries, and touched on Ohm’s Law. Along the way we looked at pull-down resistors, how to correctly size a current-limiting resistor for an LED, and how bitwise operations let us pack and unpack multiple values into a single byte for two-way serial communication. One thing for sure knowledge certainly sinks in when documenting. Next up … adding a few more features to the game.
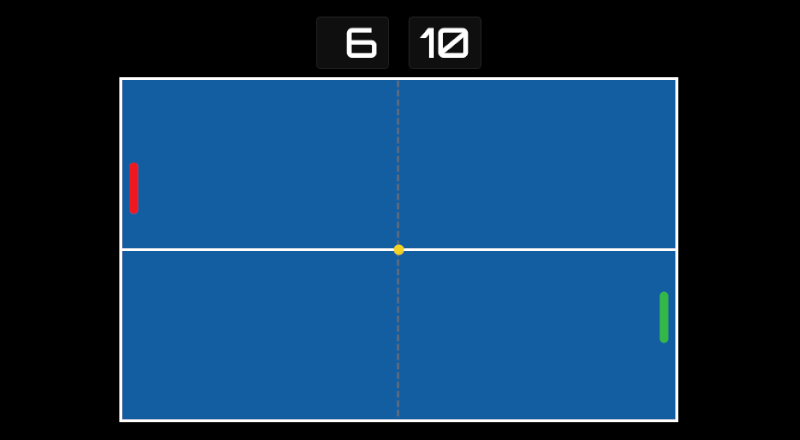
Time to give our game a bit of a makeover with a lick of paint, and have a sweep through some of the code, introducing vectors and some debugging techniques for collisions.
Scope
Description
Processing
Refreshing the visuals — new shapes, colours, and a dedicated Surface class.
Game
Adding a win condition (first to 10 points) and a space bar restart mechanic.
Code
Refactoring — consistent use of this, removing private, simplifying and tidying.
Learning
Description
Processing Graphics
How to use ellipseMode(), strokeCap(), strokeWeight(), circle(), rect(), and line() to draw styled game objects.
PVector
How to replace separate x/y and directional properties with Processing’s PVector class for cleaner position and velocity handling.
Collision Detection
How to use horizontal and vertical distance calculations for simplified, player-agnostic collision detection.
Debugging Techniques
How to use debug flags, point markers, and frame snapshots to diagnose and fix collision issues.
Getting Started
Recommended
I recommend that you go through the previous posts for this project, although completing the Arduino part of the project is not essential.
The Code
View
Clone
Download
Processing
What’s New
First thing I wanted to do was to separate the table and the Scoreboard, however I could not create a new class called Table, as this is already part of the Processing language, so having had a look around at table tennis terminology, I saw Playing Surface mentioned, so Surface it is…
Note: If a variable / class or method you are implementing changes colour in the editor, the chances are you are using a reserved word.
One of the most challenging parts of this simple game is collisions, so I created some features to assist the debugging of this; further down, I will go into more detail on these. One of the new files contains flags to control what to debug.
File
Description
Surface
Class to encapsulate the playing surface.
Debug
Debugging options.
What’s Changed
As well as changing the colour and shape of the game objects, I also had a sweep or two through the code in general, e.g. consistent use of this, so it is clear when referring to class properties, removing use of private, as not really applicable in Processing, and a bit of refactoring, moving code around, simplifying, and removing what is not needed.
File
Changes
pronguino
Implemented Surface and Debug. Added logic to end the game. Added logic to restart game.
Ball
Added vectors for position and direction. Changed shape. Added colour. Improved collision functions. Added debug method.
Constants
Added SCORE_MAX. Added KEY_SPACE.
Net
Added colour.
Options
Added colour options. Added debug toggle.
Paddle
Added vectors for position and direction. Changed shape. Added colour. Improved collision functions. Added debug method.
Scoreboard
Separated from table. Changed font. Added ‘board’
Play
Have a play, first to 10 is the winner, hit space to restart .. or watch 43 seconds of nail-biting play below …
Pronguino
Graphics
Let’s have a look at some of the shape methods being used to draw the game objects in this version of Pronguino…
Surface
The strokeWeight() and stroke() will determine the thickness and colour of both the surface border and the service rule line(), there is no need to set this before each, unless a different thickness or colour is required. The fill() method will determine the fill colour of the subsequently drawn shape, in this case a rectangle using the rect() method.
// Line Width & ColourstrokeWeight(this.lineWidth);stroke(#ffffff);// Surfacefill(#135da1);rect(this.x,this.y,this.w,this.h);// Service Rule Lineline(this.x,this.y+(this.h/2),this.x+this.w,this.y+(this.h/2));
Paddle
The strokeCap() method determines the style of line endings, in this case ROUNDed.
Use the ellipseMode() method to set how the circle() parameters are interpreted, in this case RADIUS is used, where x,y will be the centre, and third parameter as the radius.
// x, y = centre, r = radiusellipseMode(RADIUS);// Colourfill(this.colour);stroke(this.colour);// Drawcircle(this.location.x,this.location.y,this.radius);
Challenge: I have left a few “magic numbers” lying around, see if you can get these setup in the Options class, and as properties as required.
Vectors
We will look into the use of vectors within the context of this version of Pronguino, there are literally books written just about vectors, but for now we will keep it on point and simple, no need for lab coats and goggles just yet.
In the previous versions of Ball, we had the following properties…
Where the previous horizontalDirection and verticalDirection properties have been replaced with velocity(x,y) … the resulting new location would be…
location
velocity
speed
new location
x
y
x
y
x
y
400.0
300.0
-1.0
1.0
5.0
395.0
305.0
Learn: Do some further reading on the Processing PVector class, and it’s methods and properties.
Collisions
I have simplified the hits method of Paddle class, removed need to identify the Player, and used a combination of the horizontalDistance and verticalDistance to identify a collision.
Because ball.move() is called before the player.hits() check, and before ball.display() in the main pronguino file, the collision is detected one frame ahead, leaving the ball displayed at its previous position.
Experiment: In the above example the options.ballSpeed has been set to 5.0, so the math involved is simpler, and where most of the game object co-ords are all dividable by 5.0, the collisions look reasonably smooth, however, I haven’t taken in consideration speed into the calculations of the collision, yet, play around with the speed settings and see what happens.
Debugging
One of the trickiest aspects of developing this game, is getting the collisions right, and as smooth as possible, due to the collision happening so fast, it is difficult to see what is actually happening, and know what to adjust, so I have introduced a few ideas to assist in the debugging of collisions.
Note: When in debug mode, you will see a trail of the ball when it goes off the surface, this is expected, due to snapshots not being captured correctly when the background is redrawn in draw() loop, so it has been disabled during debug.
Options
I have added a flag debug in the Settings which needs to be set to true in order to trigger debug actions, and also added a new class Debug, which includes flags such as…
booleanplayerHitsBall;// Debug option for when the paddle hits the ballbooleanballPositionAtPlayerPaddle;// Debug option for when the ball is re-positioned
… which determine areas that require debugging.
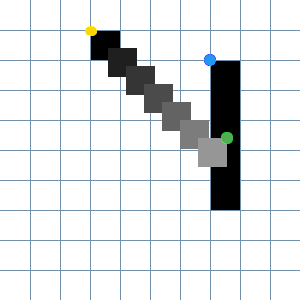
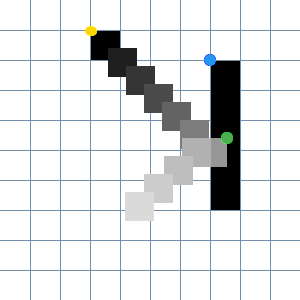
Points
In the display() methods of Ball and Paddle, the following code, which, when the relevant flags are set will display a subtle black dot where the centre (x,y) of the ball is, and the starting point of the paddle line, so when a snapshot is taken, it acts as a guide on what adjustments need to be made.
It will also display the outline of where the ball would be at collision, see the modified code in Ball where it just changes the fill and colour before drawing, if true is passed in…
Challenge: Have a go at implementing the debug code for paddleHitsBoundary and ballHitsBoundary options.
Conclusion
We now have a much improved, new-look Pronguino — cleaner code, polished visuals, improved distance-based collision detection, and PVector replacing the old separate directional properties. The debugging tools introduced here are genuinely useful when things go wrong with collisions, and worth keeping in mind for future posts. Next up … Servuino to add more components to the circuit and more features to the game.
OK, so we have our basic Prong game — it’s time to transform it into Pronguino by adding Arduino paddle controllers. It’s going to be a simple circuit, but a great start to learn about voltage division, serial communications and bitwise operations.
Scope
Description
Circuit
Building a two-potentiometer controller circuit on the breadboard.
Arduino
Reading analogue values from the potentiometers, packing two 4-bit values into a single byte, and sending it to Processing over serial.
Processing
Receiving the serial data, unpacking the two nibbles, and using them to control the paddles.
Game
Replacing keyboard controls with the Arduino potentiometer controllers.
Learning
Description
Potentiometers
How potentiometers work as voltage dividers and how the Arduino ADC converts the voltage to a 0–1023 value.
Serial Communication
How one-way serial communication works between the Arduino UNO and Processing.
Bitwise Operations
How to pack two 4-bit values into a single byte using bit shifting and bitwise OR, and unpack them with bit shifting and bitwise AND.
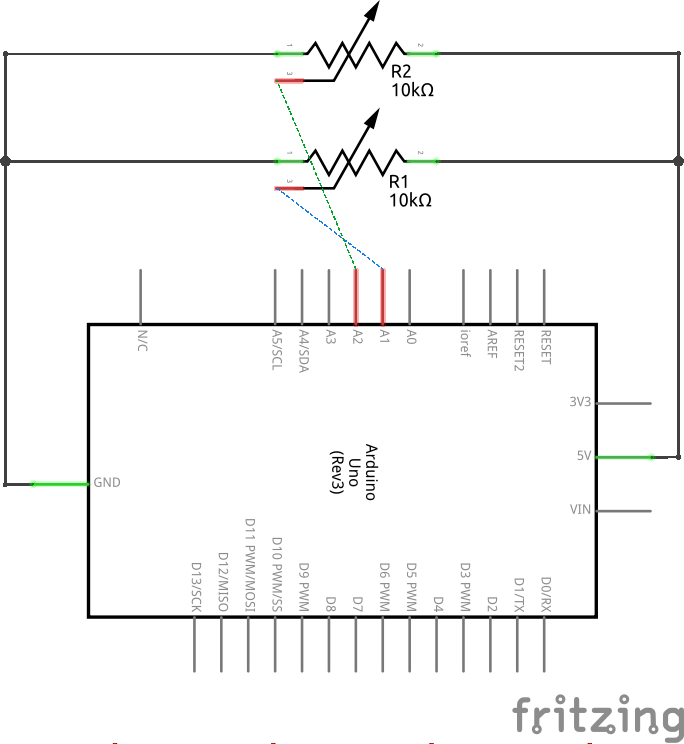
Fritzing
How to use Fritzing to produce breadboard layouts and schematics.
Tinkercad
How to simulate an Arduino circuit in Tinkercad before building it.
Getting Started
First, we will focus on building the circuit and programming the Arduino UNO, making sure everything compiles and uploads OK.
Recommended
I recommend that you read and run through ‘Project 14 – Tweak the Logo’ in the Arduino Projects Book, as this will give a bit more background on what we are doing here.
Components
All the components you need are in the Arduino Starter Kit.
Component
Quantity
Arduino UNO Rev 3
1
USB Cable
1
Breadboard
1
Potentiometer 10kΩ
2
Jumper Wires
6
Black Stranded Jumper Wire
1
Red Stranded Jumper Wire
1
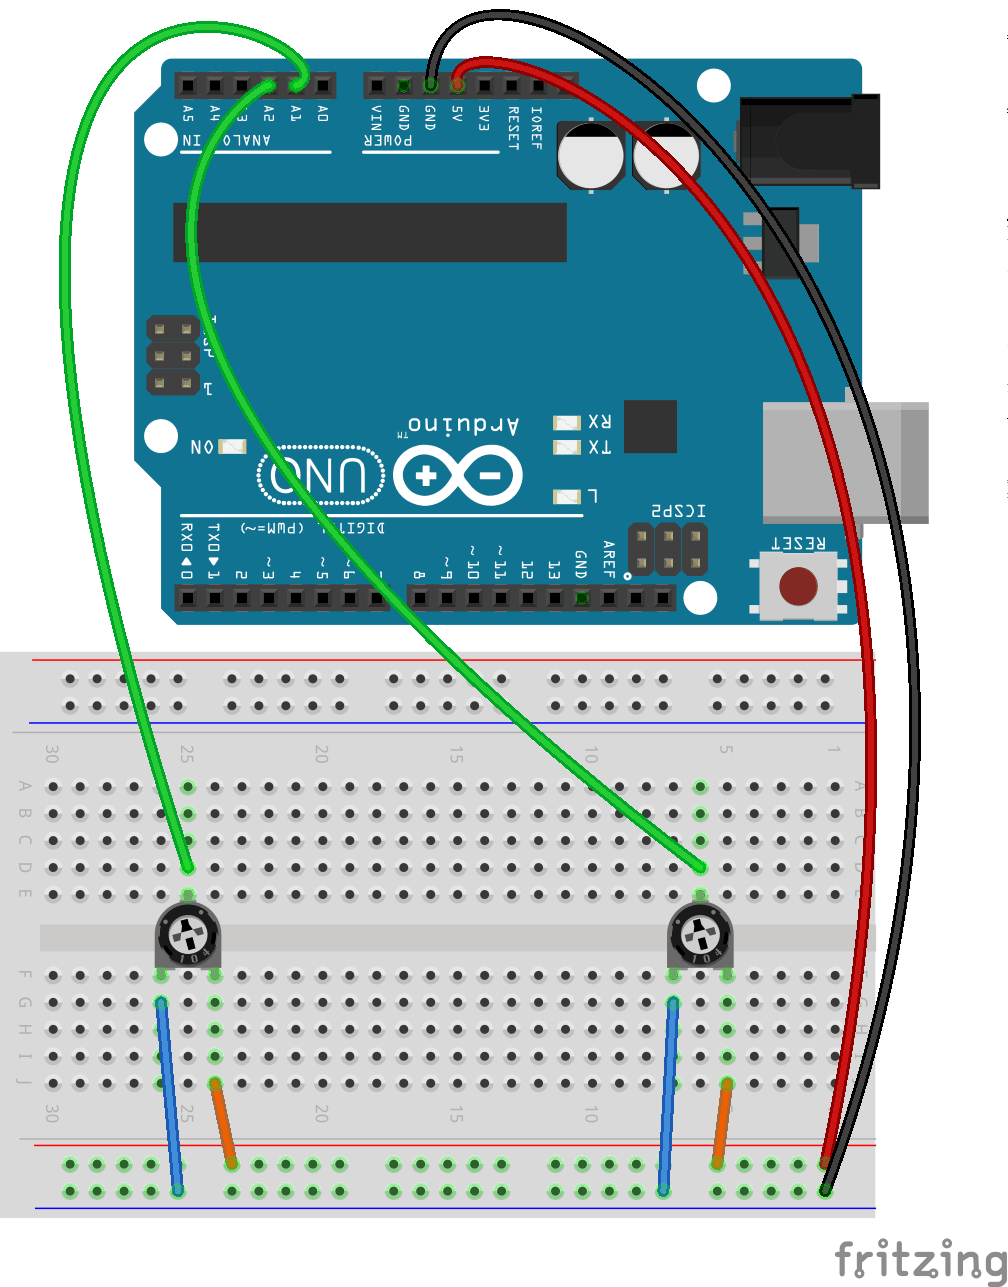
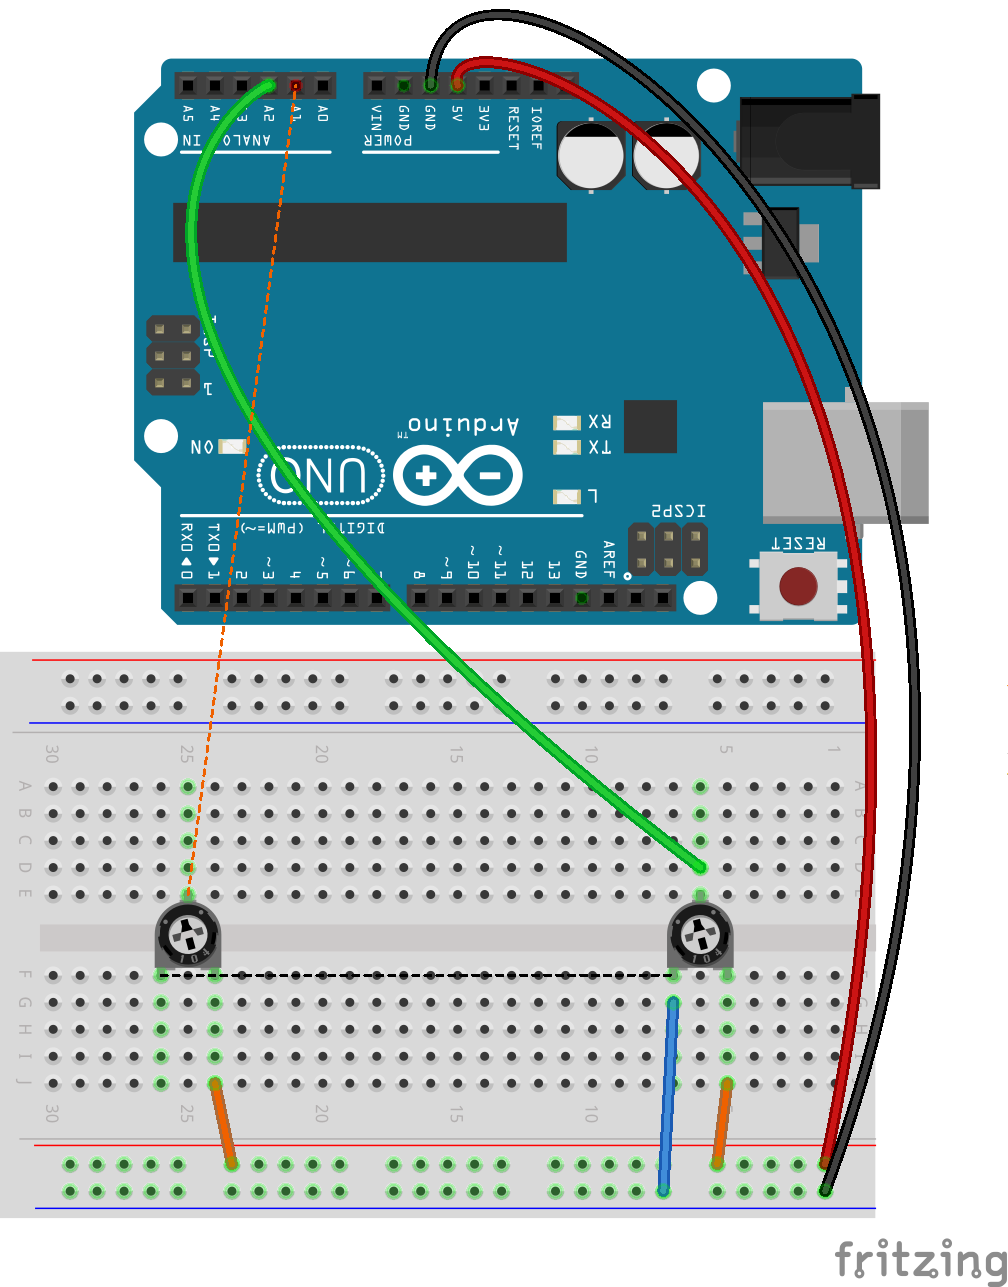
The Circuit
Assembly
These instruction steps are used to assemble the circuit as shown above, quite straightforward with some added tips:
Step
Instructions
1
Ensure you have unplugged from power source and at least one end of USB cable is removed from either the UNO / computer.
2
Connect the red stranded jumper wire to one of the bus lines on the breadboard marked with + to the 5V pin on the UNO.
3
Connect the black stranded jumper wire to the adjacent bus line marked with – to the GND (Ground) pin on the UNO.
4
The potentiometers that come with the kit have to straddle the centre of the breadboard, so place one on the left of the board so the side with two legs is facing the bus line where you connected the power. Place the other on the right-hand side. Make sure you press them in firmly, so they don’t wobble.
5
Connect one of the smaller jumper wires (15mm blue ones seem to do the trick) from a board socket aligned with the left leg of potentiometer to the – socket on the bus line where you have connected black wire. Do the same with the other potentiometer.
6
Connect another of the smaller wires (the 5mm orange one) from a board socket aligned with the right leg of potentiometer to the + socket on the bus line where you have connected red wire. Do the same with the other potentiometer.
7
On the other side of the board where the single legs (wipers) of the potentiometers are, connect a green jumper wire from a socket aligned with the wipers, to the Analog-In A1 pin on the UNO, for the left hand side potentiometer, and A2 for the one on the right.
The Code
View
Clone
Download
Arduino
We could write this code in a few lines in one file, but as I want to make the code more readable, understandable and extensible, I have broken it down into the following files …
File
Description
pronguino
The main file. Similar to Processing, setup() initialises the serial communications and controllers, and loop() continuously reads the values from the controllers and writes them to the serial port.
Controller.h
Header file for the Controller library.
Controller.cpp
C++ implementation of the Controller library. Library Packaging will be covered in a later post.
I will let the code speak for itself, and take a deeper dive into some areas below.
Plug the Arduino into your PC, upload the sketch, and we are ready for the next step.
Testing
Note: If you have a mobile phone or similar attached to your computer via USB, you may get some spurious results, bear this in mind if you are getting strange movement from paddles with or without Arduino attached.
So, we have the controllers built, code uploaded, and usually you would update the Processing code and spend the next few hours playing Pronguino, right? Or maybe the next few hours debugging two sets of code and an electronic circuit?
We haven’t got the luxury of a user interface on the UNO, but what we do have while connected to the PC is the Serial Monitor, which is opened from the Arduino IDE: Tools → Serial Monitor.
I have added a constant called TESTING, and when set to false, on upload of code, you should see something like this, as you turn the potentiometers, which is the data being written to the serial port.
If you change TESTING to be true, upload the new code, the setup() will call function resultsHeader() to print some headings, and loop() will continuously print the data being read from each controller via the function resultsDetail(), and the data that would be written, you should see something like below under various conditions ..
Hopefully, with the circuit being quite simple, there is not much to go wrong, but the common things to check are as follows ..
Issue
Solution
Nothing is working
Check Arduino is plugged in securely. Check red & black wires on board are secure
Random data (without change potentiometer)
Check potentiometers are firmly pushed in. Check the data wires are securely connected
Getting 15 instead of 0 as a nibble value, when potentiometer turned all way to left
Check the left pin of potentiometer is connected to GND, and right to 5V
Program Storage Space
Just a quick note to those worried about testing code taking up valuable space on the Arduino, the compiler will not include any unreachable code, so when TESTING = false;, the functions resultsHeader() and resultsDetail(...) are not compiled, check console after compiling …
Sketch uses 1952 bytes (6%) of program storage space. Maximum is 32256 bytes.
Global variables use 188 bytes (9%) of dynamic memory, leaving 1860 bytes for local variables. Maximum is 2048 bytes.
… in comparison to having TESTING = true; …
Sketch uses 2424 bytes (7%) of program storage space. Maximum is 32256 bytes.
Global variables use 260 bytes (12%) of dynamic memory, leaving 1788 bytes for local variables. Maximum is 2048 bytes.
Processing
What’s New
File
Description
Controller
Contains a new class Controller, which encapsulates the values received from Arduino controllers
Functions
A new static class Functions, which contains functions that can be called from anywhere in the package, initially used for some bitwise calculations
What’s Changed:
File
Changes
pronguino
Imports serial library. Initialises serial port in setup(). Added serialEvent()
Experiment: The paddle movement seems OK when you are just turning the potentiometers at a steady rate, but can sometimes get out of sync. Have a tinker with checkController() in Player class and/or the timing of the outgoing data in Arduino code or incoming data in the Processing code to see if it can be improved.
Play
Take a break, and play one long (we will look into that soon) game of Pronguino.
Challenge: Currently, when turning controller to left the paddle moves up, and turning right moves it down. If you prefer the opposite, without changing the circuit, just edit either the Processing or Arduino code.
Potentiometers
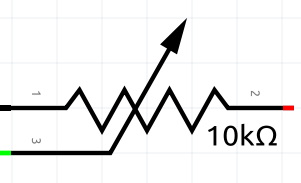
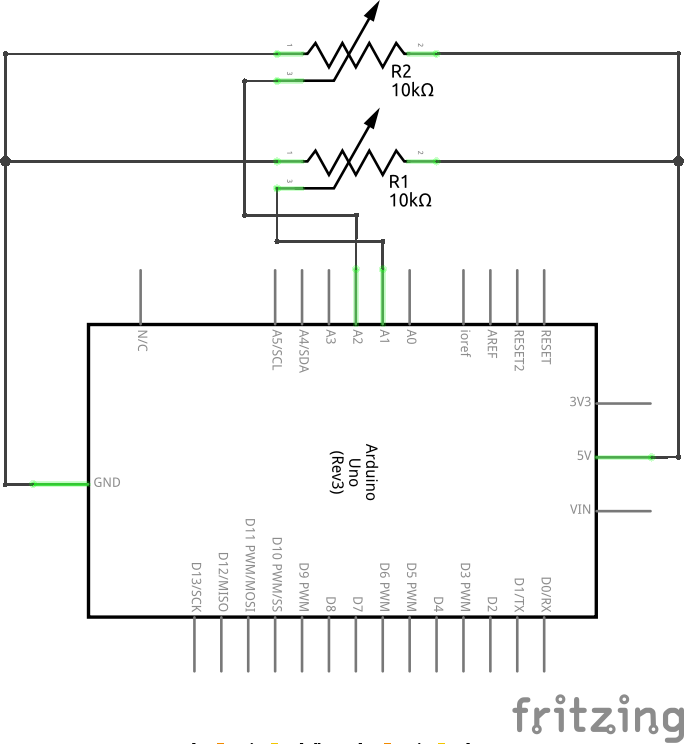
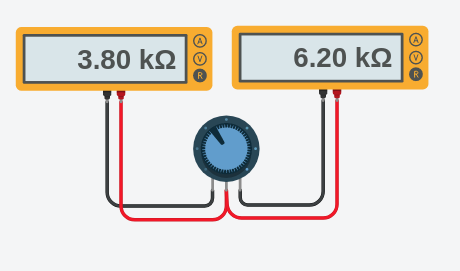
In the context of this circuit the potentiometers are being used as voltage dividers.
Terminal 1 (\(T_1\)) connected to GND
Terminal 2 (\(T_2\)) connected to 5V
Terminal 3 (\(T_3\)) connected to A1 or A2
Given that …
Symbol
Description
From
To
Equation
Value
\(V\)
Voltage Supply
\(T_1\)
\(T_2\)
5 Volts
\(R\)
Total Resistance
\(T_1\)
\(T_2\)
\(R_1 + R_2\)
10k Ohms
… and turning the potentiometer to various positions, we would get the voltage drop required…
Symbol
Description
From
To
Equation
Left
Middle
Right
\(R_1\)
Resistance
\(T_2\)
\(T_3\)
10kΩ
5kΩ
0Ω
\(R_2\)
Resistance
\(T_1\)
\(T_3\)
0Ω
5kΩ
10kΩ
\(V_{out}\)
Voltage
\(T_1\)
\(T_3\)
\(\frac{R_2}{R_1+R_2} \cdot V\)
0V
2.5V
5V
… which is then measured by analog inputs A1 or A2 and converted by the ADC (Analog-to-Digital Converter) into a resolution of 10 bits (0-1023).
Learn: I find it important to get to know your components, and how they work. It helps when things don’t work as planned. Learn some of the equations such as Ohm’s Law and Voltage Division Rule etc.
Bitwise Operations
Reference
Operator
Name
Condition
Example
Result
&
AND
If both are 1
1 & 1 1 & 0
1 0
|
OR
If either is 1
1 | 0 0 | 0
1 0
^
XOR
If both different
1 ^ 0 1 ^ 1
1 0
~
NOT
Changes to opposite
NOT 0 NOT 1
1 0
<<
Left Shift
Shifts n bits left
00001000 << 2
00100000
>>
Right Shift
Shifts n bits right
01000000 >> 3
00001000
Bitwise Operators
Term
Bits
Range (Binary)
Range (Hex)
Range (Decimal)
Bit
1 bit
0 to 1
0x0 to 0x1
0 to 1
Nibble
4 bits
0000 to 1111
0x0 to 0xF
0 to 15
Byte
8 bits
00000000 to 11111111
0x00 to 0xFF
0 to 255
Terms
0
1
2
3
4
5
6
7
8
9
A
B
C
D
E
F
0
1
2
3
4
5
6
7
8
9
10
11
12
13
14
15
Hexadecimal Values
High
Low
bit8
bit7
bit6
bit5
bit4
bit3
bit2
bit1
Nibbles
bit8
bit7
bit6
bit5
bit4
bit3
bit2
bit1
128
64
32
16
8
4
2
1
Bit Values (when set)
Arduino
In the Arduino code we have the following lines in the pronguino loop():
// Convert to nibblesbytehighNibble=(byte)controllerValue1<<4;bytelowNibble=(byte)controllerValue2;// Combine the two nibbles to make a bytebytedata=highNibble|lowNibble;
… where we have read the two values (ranging from 0 – 15) from each controller, and rather than sending these values individually, we will combine them into one byte to send…
Given that …
Binary
Hexadecimal
Decimal
controllerValue1
00001000
0x08
8
controllerValue2
00001010
0x0A
10
… to get the highNibble we shift controllerValue1 left 4 bits …
Binary
Hexadecimal
Decimal
controllerValue1
00001000
0x08
8
<< 4
highNibble
10000000
0x80
128
… we are only changing data type of controllerValue2 to get lowNibble, so to get data we bitwise OR highNibble and lowNibble …
Binary
Hexadecimal
Decimal
highNibble
10000000
0x80
128
| lowNibble
00001010
0x0A
10
data
10001010
0x8A
138
Processing
In the Processing code we have two functions in the Functions file:
/**
* Extracts a high nibble (first four bits) from a byte
*
* @param data byte to extract nibble from
*/staticintgetHighNibble(bytedata){return(int)((data>>4)&(byte)0x0F);}/**
* Extracts a low nibble (last four bits) from a byte
*
* @param data byte to extract nibble from
*/staticintgetLowNibble(bytedata){return(int)(data&0x0F);}
When the serialEvent() function receives the data sent from the Arduino, it needs to be split up to identify the movement of each of the controllers … for controller 1, getHighNibble(byte data) is called …
First the data needs shifting to the right 4 bits …
Binary
Hexadecimal
Decimal
data
10001010
0x8A
138
>> 4
result
00001000
0x08
8
… and then apply a bitwise AND with 0x0F …
Binary
Hexadecimal
Decimal
result
00001000
0x08
8
& 0x0F
00001111
highNibble
00001000
0x08
8
.. and to get value for controller 2 we call getLowNibble(byte data) .. and bitwise AND data with 0x0F ..
Binary
Hexadecimal
Decimal
data
10001010
0x8A
138
& 0x0F
00001111
lowNibble
00001010
0x0A
10
Fritzing
Fritzing provides a software tool that allows you to draw schematics, mock up your breadboard, upload code to devices, design PCB layouts and also offers a service to print PCBs. I have used this to produce the schematic and breadboard mock-up for the “controllers”.
Schematic
Breadboard
Learn: It is definitely worth getting to grips with circuit design and prototyping with tools such as Fritzing, even for the simplest of circuits, as when they become more complex, you want to be focusing on the circuit and not how to use the tool!
The cool thing about doing this using Fritzing, is the schematic and breadboard are continuously checking and modifying each other. For example, if you started with the breadboard and just add the required components on, without any wires, then go to schematic and connect everything up logically, switching back to the breadboard will show dashed lines from pins to sockets as a guide to where the wires should go (known as a ratsnest), and will disappear as wires are added.
Schematic (Ratsnest)
Breadboard (Ratsnest)
Note, as the ratsnest is being created from a logic diagram, they will take the most direct route i.e. joining pins from one potentiometer to the other as they are both connected to GND, and as we don’t want all the wires going from component to component, in this case we would take a wire from each component to a GND socket on the board.
Similarly, if you started with a fully wired up breadboard, and then switched to create schematic, you have to re-arrange the connections and components to create a tidy looking diagram, the connections will highlight red where no connection has been made, and green when all good, ratsnest guides are also created in this view.
This Fritzing file is included in the download for this post.
Tinkercad
Flipped your LED? Fried your chips? Or toasted your breadboard? If you haven’t yet and you’re paranoid about forgetting to put that resistor in, then it is worth taking a look at Tinkercad. Whilst Fritzing suits my needs for schematics and breadboards, I searched around for some free simulation software, and for basic Arduino circuits, this fitted the bill.
It has all the components from Arduino Starter Kit, and more. As you get more daring with your circuits, you may want to try it out first with Tinkercad — it will show you when something blows. Also useful for measuring resistance/voltage etc as you can add a multi-meter.
Flipped LED
Measure Resistance
Tinkercad Limitations:
Limitation
Workaround
As it is web based you cannot communicate with a physical serial port
Set TESTING = true and use the virtual serial monitor
You cannot add files to code window (e.g., Controller.cpp and Controller.h)
Implement the class Controller at the top of the main file
Tinkercad Limitations
Code
/**
Pronguino.ino - Main file for controllers
Tinkercad version
Parts required:
- 2 x 10 kilohm potentiometers
@author Neil Deighan
*/// Controller classclassController{public:Controller(){}Controller(intpin){_pin=pin;}intread(){// Reads value from pin, which would be a value mapped from 0 to 5V (0 to 1023)intpinValue=analogRead(_pin);// Small delay to allow the Analog-to-Digital Converter (ADC) to processdelay(1);// Map the pin value to number between 0 and 15intvalue=map(pinValue,0,1023,0,15);returnvalue;}private:int_pin;};// Define constantsconstintCONTROLLER_COUNT=2;constintCONTROLLER_ONE=0;constintCONTROLLER_TWO=1;constintCONTROLLER_ONE_ANALOG_PIN=A1;constintCONTROLLER_TWO_ANALOG_PIN=A2;// Special constant to turn on / off testing modeconstboolTESTING=true;// Declare controllersControllercontrollers[CONTROLLER_COUNT];/**
Setup the serial communications and controllers
*/voidsetup(){// Initialize serial communicationSerial.begin(9600);// Create Controllerscontrollers[CONTROLLER_ONE]=Controller(CONTROLLER_ONE_ANALOG_PIN);controllers[CONTROLLER_TWO]=Controller(CONTROLLER_TWO_ANALOG_PIN);// Print debug headersif(TESTING){resultsHeader();}}/**
Continuously read/write controller values
*/voidloop(){// Read the values from each controllerintcontrollerValue1=controllers[CONTROLLER_ONE].read();intcontrollerValue2=controllers[CONTROLLER_TWO].read();// Convert to nibblesbytehighNibble=(byte)controllerValue1<<4;bytelowNibble=(byte)controllerValue2;// Combine the two nibbles to make a bytebytedata=highNibble|lowNibble;if(TESTING){// Print results detailresultsDetail(controllerValue1,controllerValue2,highNibble,lowNibble,data);}else{// Write the data to serial portSerial.write(data);}// Delay 150 millisecondsdelay(150);}/**
Print Results Header to Serial Monitor
*/voidresultsHeader(){Serial.print("controllerValue1\t");Serial.print("controllerValue2\t");Serial.print("highNibble\t");Serial.print("lowNibble\t");Serial.print("data\t");Serial.println();}/**
Print Results Detail to Serial Monitor
*/voidresultsDetail(intcontrollerValue1,intcontrollerValue2,bytehighNibble,bytelowNibble,bytedata){Serial.print(controllerValue1);Serial.print("\t\t\t");Serial.print(controllerValue2);Serial.print("\t\t\t");Serial.print(highNibble);Serial.print("\t\t");Serial.print(lowNibble);Serial.print("\t\t");Serial.println(data);// Slow it down a bit, so can be read, waits one seconddelay(1000);}
This TinkerCad code is included in the download for this post.
Conclusion
We now have Pronguino up and running, with two potentiometer-based Arduino controllers communicating with Processing over serial. Along the way we covered voltage division and analogue-to-digital conversion, packed and unpacked controller values using bitwise operations, and used Fritzing and Tinkercad to design and simulate the circuit. Hopefully the level of detail here gives you a useful reference to look back on. Next up … updating the look with Praint to explore more of what Processing can do.
So … I have not long purchased the Arduino Starter Kit, with a view to learning more about electronics. Upon finishing the project in Chapter 14 – Tweak the Logo, I turned and twisted the potentiometer, marvelling at the change of background colours, I was suddenly thrown back to the 70s, and thought … I need to create Pong … and a controller… and it is going to be called …
I realise this has been done thousands of times, in different languages, but for the purposes of these posts, I wanted to learn, create, share and challenge myself, hopefully provide a few hints and tips to others as I learn. This project is aimed at those who have not long started experimenting with Arduino and Processing — some programming experience is desirable, and completing the projects in the Starter Kit would be an advantage. That said, if like myself you are an experienced developer looking for something a little different, welcome aboard.
Scope
Description
Processing
Building the game entirely in Processing, with a dedicated class file for each game object.
Game
Implementing the core Pong mechanics — ball movement, keyboard-controlled paddles, collision detection, and scoring.
Learning
Description
Processing Basics
How Processing’s setup() and draw() functions drive the game loop.
Object-Oriented Design
How to structure a game using a class file per game object.
Constants & Options
How to use dedicated files for constants and configurable options to keep code readable and flexible.
Collision Detection
How to detect collisions between the ball and paddles using bounding box comparisons.
Getting Started
Where do we start? Having already installed Processing, I trawled through some of the examples and online tutorials to see what it is capable of, this was going to be the language of choice.
Next, I wandered over to YouTube, to watch some game-play from the original Atari arcade game, I wanted the initial version to be as close to this as possible.
I decided to publish with a version that was ready to play out-of-the-box, so to speak, and rather than just build up the game from scratch with the bare bones of code required, I added a little structure and self-documentation to make the code easily understood and extensible.
The Real World
Let’s have a quick look at what we are trying to do … in terms of the ‘real’ world …
We have a 'wall'
We have a 'table' with a Net
We have a Ball
We have two Players
Each Player has a Paddle
We have a Scoreboard for each Player's score
… actions that are going on in the game
The Ball is moving
Player moves the Paddle
Scoreboard shows current Player's score
… and then some rules and logic …
If the Ball hits wall
Ball bounces and moves in opposite direction
If the Player's Paddle hits wall
Paddle stops moving
If the Player's Paddle hits Ball
Ball bounces and moves in opposite direction
If the Player's Paddle misses Ball
Add point to opposite Player's score
Position Ball at starting point
Set direction of Ball
The Code
View
Clone
Download
Processing
You can see in the code that we have a class file for each game object Ball, Net, Player, Paddle and Scoreboard, along with the main pronguino file, in which the setup() will create our game objects, and the looping draw() function implements the actions and rules mentioned above, as well as displaying the objects …
Learn: Use the Processing Language Reference for documentation on any of the keywords and functions used in the code.
As I mentioned earlier, I wanted to create this initial version with some structure, readability and extendability. The Constants file is where you would place logically named constants to replace any hard-coded values with little meaning i.e. instead of players[0].score, we would use players[Constants.PLAYER_ONE].score. These values would typically never need to change.
The Options file is used to store adjustable values, you would also use these in the code as opposed to hard-coded values, i.e. float fontSize = options.scoreboardFontSize; and you only need to change them in one place. These would typically be saved and loaded, if we had a user interface in the game to control these … will look into this in a later post.
Experiment: Change some of the options … i.e. ball / paddle speed etc.
Play
In the Options file you will see that I have set some initial keys for paddle control:
Control
Player 1
Player 2
Up
q
p
Down
a
l
… have a break, have a play.
Prong
Collisions
I have tried to make the code as self-documented as possible, with a few comments thrown in for good measure, however, I would like to elaborate more on one of the key aspects of the game … collisions. As with most games, there is usually something that hits another thing, and an action has to happen. I will use the If the Player’s Paddle hits Ball as an example to explain, the others will follow a similar principle.
This snippet of code is from the main pronguino file, where we check if the Player hits the Ball:
… and because the Player ‘has’ the Paddle, the following call to the hits() function in Player is made:
booleanhits(Ballball){returnpaddle.hits(ball);}
… where we get to the nuts & bolts in the Paddle class — parent is the Player, and this refers to the current Paddle instance. The code below will be the focus of what follows …
… the first figure below shows the Ball moving towards the Paddle, where speed is currently set at 6.0, set from the Options class and both the horizontalDirection and verticalDirection are 1.0 …
Sometimes, looking at the conditions in this type of function can drive you mad … in the table below I have broken down each condition tested, along with the results from the given properties of the moving Ball and Paddle … when all conditions are met, the hits() function returns true as collision is made …
ball
this
(ball.x + ball.w) > this.x
ball.y >= this.y
ball.y <= (this.y + this.h)
hits
x
y
w
x
y
h
c1
c2
c3
c1 AND c2 AND c3
580
125
10
620
135
50
false
false
true
false
586
131
10
620
135
50
false
false
true
false
592
137
10
620
135
50
false
true
true
false
598
143
10
620
135
50
false
true
true
false
604
149
10
620
135
50
false
true
true
false
610
155
10
620
135
50
false
true
true
false
616
161
10
620
135
50
true
true
true
true
… and then, we reposition the Ball and bounce it in the opposite direction on its x-axis, shown in the second figure above, have a look at the code in the Ball file to see what’s going on.
Experiment: As the “physics” used in this example are very basic, they are not perfect. You will see when you comment out the line ball.positionAtPlayer(player); inside the draw() loop, and play the game, occasionally the ball bounces behind the paddle, so I added this to adjust this bug feature. There are a few other features like this, but will look at these at a later stage.
Conclusion
What started as inspiration from a chapter in the Arduino Projects Book has led to creating a very basic version of one of the earliest arcade video games — which in turn motivated me to create this site and start blogging.
One of the important aspects of this project is that I have not looked up how to write Pong in Processing (or any other language), or how to build a controller with Arduino. I am new to both, and new to electronics, but I am not new to software development — so I wanted to approach this without looking at how others might tackle the same thing, and start completely from scratch.
The core mechanics are in place: a moving ball, two keyboard-controlled paddles, collision detection, and a scoreboard. It is deliberately simple, and that is the point — there is plenty of room to learn and build on from here. Next up … adding Arduino controllers to the mix.