Prong
Processing Pong with Arduino
Introduction
So … I have not long purchased the Arduino Starter Kit, with a view to learning more about electronics. Upon finishing the project in Chapter 14 – Tweak the Logo, I turned and twisted the potentiometer, marvelling at the change of background colours, I was suddenly thrown back to the 70s, and thought … I need to create Pong … and a controller… and it is going to be called …

I realise this has been done thousands of times, in different languages, but for the purposes of these posts, I wanted to learn, create, share and challenge myself, hopefully provide a few hints and tips to others as I learn. This project is aimed at those who have not long started experimenting with Arduino and Processing — some programming experience is desirable, and completing the projects in the Starter Kit would be an advantage. That said, if like myself you are an experienced developer looking for something a little different, welcome aboard.
Scope
| Description | |
|---|---|
| Processing | Building the game entirely in Processing, with a dedicated class file for each game object. |
| Game | Implementing the core Pong mechanics — ball movement, keyboard-controlled paddles, collision detection, and scoring. |
Learning
| Description | |
|---|---|
| Processing Basics | How Processing’s setup() and draw() functions drive the game loop. |
| Object-Oriented Design | How to structure a game using a class file per game object. |
| Constants & Options | How to use dedicated files for constants and configurable options to keep code readable and flexible. |
| Collision Detection | How to detect collisions between the ball and paddles using bounding box comparisons. |
Getting Started
Where do we start? Having already installed Processing, I trawled through some of the examples and online tutorials to see what it is capable of, this was going to be the language of choice.
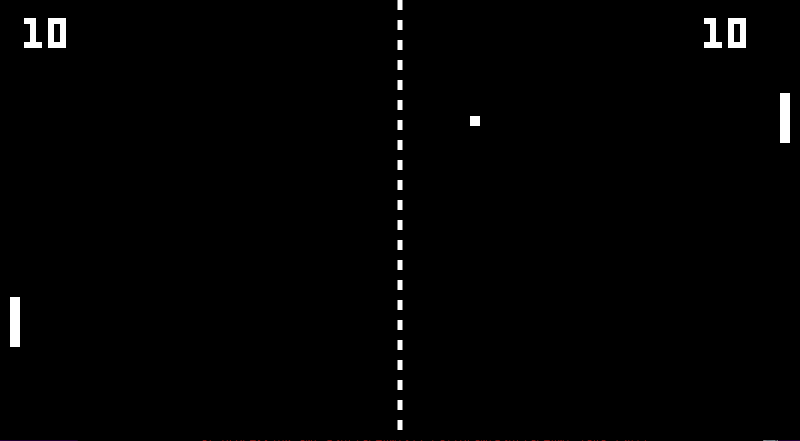
Next, I wandered over to YouTube, to watch some game-play from the original Atari arcade game, I wanted the initial version to be as close to this as possible.
I decided to publish with a version that was ready to play out-of-the-box, so to speak, and rather than just build up the game from scratch with the bare bones of code required, I added a little structure and self-documentation to make the code easily understood and extensible.
The Real World
Let’s have a quick look at what we are trying to do … in terms of the ‘real’ world …
- We have a 'wall'
- We have a 'table' with a Net
- We have a Ball
- We have two Players
- Each Player has a Paddle
- We have a Scoreboard for each Player's score
… actions that are going on in the game
- The Ball is moving
- Player moves the Paddle
- Scoreboard shows current Player's score
… and then some rules and logic …
- If the Ball hits wall
- Ball bounces and moves in opposite direction
- If the Player's Paddle hits wall
- Paddle stops moving
- If the Player's Paddle hits Ball
- Ball bounces and moves in opposite direction
- If the Player's Paddle misses Ball
- Add point to opposite Player's score
- Position Ball at starting point
- Set direction of Ball
The Code
Processing
You can see in the code that we have a class file for each game object Ball, Net, Player, Paddle and Scoreboard, along with the main pronguino file, in which the setup() will create our game objects, and the looping draw() function implements the actions and rules mentioned above, as well as displaying the objects …
Learn: Use the Processing Language Reference for documentation on any of the keywords and functions used in the code.
As I mentioned earlier, I wanted to create this initial version with some structure, readability and extendability. The Constants file is where you would place logically named constants to replace any hard-coded values with little meaning i.e. instead of players[0].score, we would use players[Constants.PLAYER_ONE].score. These values would typically never need to change.
The Options file is used to store adjustable values, you would also use these in the code as opposed to hard-coded values, i.e. float fontSize = options.scoreboardFontSize; and you only need to change them in one place. These would typically be saved and loaded, if we had a user interface in the game to control these … will look into this in a later post.
Experiment: Change some of the options … i.e. ball / paddle speed etc.
Play
In the Options file you will see that I have set some initial keys for paddle control:
| Control | Player 1 | Player 2 |
|---|---|---|
| Up | q | p |
| Down | a | l |
… have a break, have a play.
Collisions
I have tried to make the code as self-documented as possible, with a few comments thrown in for good measure, however, I would like to elaborate more on one of the key aspects of the game … collisions. As with most games, there is usually something that hits another thing, and an action has to happen. I will use the If the Player’s Paddle hits Ball as an example to explain, the others will follow a similar principle.
This snippet of code is from the main pronguino file, where we check if the Player hits the Ball:
if (player.hits(ball)) {
  // Reposition
  ball.positionAtPlayer(player);
  // Bounce
  ball.bounce(Constants.AXIS_HORIZONTAL);
}
… and because the Player ‘has’ the Paddle, the following call to the hits() function in Player is made:
boolean hits(Ball ball) {
  return paddle.hits(ball);
}
… where we get to the nuts & bolts in the Paddle class — parent is the Player, and this refers to the current Paddle instance. The code below will be the focus of what follows …
boolean hits(Ball ball) {
  return ((ball.x < (this.x + this.w) && parent.index == Constants.PLAYER_ONE) ||
          ((ball.x + ball.w) > this.x && parent.index == Constants.PLAYER_TWO)) &&
          (ball.y >= this.y && ball.y <= (this.y + this.h));
}
… the first figure below shows the Ball moving towards the Paddle, where speed is currently set at 6.0, set from the Options class and both the horizontalDirection and verticalDirection are 1.0 …
void move() {
  x += (speed * horizontalDirection);
  y += (speed * verticalDirection);
}
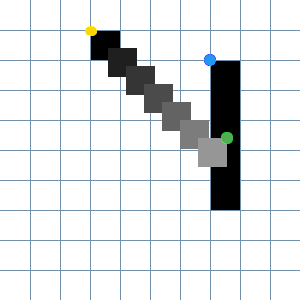
Sometimes, looking at the conditions in this type of function can drive you mad … in the table below I have broken down each condition tested, along with the results from the given properties of the moving Ball and Paddle … when all conditions are met, the hits() function returns true as collision is made …
| ball | this | (ball.x + ball.w) > this.x | ball.y >= this.y | ball.y <= (this.y + this.h) | hits | |||||
|---|---|---|---|---|---|---|---|---|---|---|
| x | y | w | x | y | h | c1 | c2 | c3 | c1 AND c2 AND c3 | |
| 580 | 125 | 10 | 620 | 135 | 50 | false | false | true | false | |
| 586 | 131 | 10 | 620 | 135 | 50 | false | false | true | false | |
| 592 | 137 | 10 | 620 | 135 | 50 | false | true | true | false | |
| 598 | 143 | 10 | 620 | 135 | 50 | false | true | true | false | |
| 604 | 149 | 10 | 620 | 135 | 50 | false | true | true | false | |
| 610 | 155 | 10 | 620 | 135 | 50 | false | true | true | false | |
| 616 | 161 | 10 | 620 | 135 | 50 | true | true | true | true | |
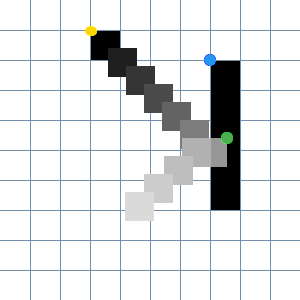
… and then, we reposition the Ball and bounce it in the opposite direction on its x-axis, shown in the second figure above, have a look at the code in the Ball file to see what’s going on.
Experiment: As the “physics” used in this example are very basic, they are not perfect. You will see when you comment out the line ball.positionAtPlayer(player); inside the draw() loop, and play the game, occasionally the ball bounces behind the paddle, so I added this to adjust this bug feature. There are a few other features like this, but will look at these at a later stage.
Conclusion
What started as inspiration from a chapter in the Arduino Projects Book has led to creating a very basic version of one of the earliest arcade video games — which in turn motivated me to create this site and start blogging.
One of the important aspects of this project is that I have not looked up how to write Pong in Processing (or any other language), or how to build a controller with Arduino. I am new to both, and new to electronics, but I am not new to software development — so I wanted to approach this without looking at how others might tackle the same thing, and start completely from scratch.
The core mechanics are in place: a moving ball, two keyboard-controlled paddles, collision detection, and a scoreboard. It is deliberately simple, and that is the point — there is plenty of room to learn and build on from here. Next up … adding Arduino controllers to the mix.