Introduction
Time to give our game a bit of a makeover with a lick of paint, and have a sweep through some of the code, introducing vectors and some debugging techniques for collisions.
Getting Started
Recommended
I recommend that you go through the previous posts for this project, although completing the Arduino part of the project is not essential.
The Code
Download
Processing
What’s New
First thing I wanted to do was to separate the table and the Scoreboard, however I could not create a new class called Table, as this is already part of the Processing language, so having had a look around at table tennis terminology, I saw Playing Surface mentioned, so Surface it is…
Note: If a variable / class or method you are implementing changes colour in the editor, the chances are you are using a reserved word.
One of the most challenging parts of this simple game is collisions, so created some features to assist the debugging of this, further down, I will go into more detail on these, one of the new files contains flags on what to debug.
| File | Description |
|---|---|
| Surface | Class to encapsulate the playing surface. |
| Debug | Debugging options. |
What’s Changed
As well as changing the colour and shape of the game objects, I also had a sweep or two through the code in general i.e. consistent use of this, so it is clear when referring to class properties, removing use of private, as not really applicable in processing and a bit of refactoring, moving code around, simplifying, and removing what is not needed.
| File | Description |
|---|---|
| pronguino | Implemented Surface and Debug. Added logic to end the game. Added logic to restart game. |
| Ball | Added vectors for position and direction Changed shape. Added colour. Improved collision functions. Added debug method. |
| Constants | Added SCORE_MAX.Added KEY_SPACE. |
| Net | Added colour. |
| Options | Added colour options. Added debug toggle. |
| Paddle | Added vectors for position and direction Changed shape. Added colour. Improved collision functions. Added debug method. |
| Scoreboard | Separated from table Changed font Added ‘board’ |
Play
Have a play, first to 10 is the winner, hit space to restart .. or watch 43 seconds of nail-biting play below …
Graphics
Let’s have a look at some of the shape methods being used to draw the game objects in this version of Pronguino …
Surface
The strokeWeight() and stroke() will determine the thickness and colour of both the surface border and the service rule line(), there is no need to set this before each, unless a different thickness or colour is required. The fill() method will determine the fill colour of the subsequently drawn shape, in this case a rectangle using the rect() method.
// Line Width & Colour
strokeWeight(this.lineWidth);
stroke(#ffffff);

// Surface
fill(#135da1);
rect(this.x, this.y, this.w, this.h);

// Service Rule Line
line(this.x, this.y+(this.h/2), this.x+this.w, this.y+(this.h/2));
Paddle
The strokeCap() method determines the style of line endings, in this case ROUNDed.
// Style & Colour
strokeWeight(this.w);
strokeCap(ROUND);
stroke(this.colour);

//Draw
line(this.location.x,this.location.y,this.location.x,this.location.y+this.h);
Ball
Use the ellipseMode() method to set how the circle() parameters are interpreted, in this case RADIUS is used, where x,y will be the centre, and third parameter as the radius.
// x, y = centre, r = radius
ellipseMode(RADIUS);

// Colour
fill(this.colour);
stroke(this.colour);

// Draw
circle(this.location.x, this.location.y, this.radius);
Challenge: I have left a few “magic numbers” lying around, see if you can get these setup in the Options class, and as properties as required.
Vectors
We will look into the use of vectors within the context of this version of Pronguino, there are literally books written just about vectors, but for now we will keep it on point and simple, no need for lab coats and goggles just yet.
In the previous versions of Ball, we had the following properties …
float x;
float y;
...
private int horizontalDirection;
private int verticalDirection;
… which have now been replaced with ..
PVector location;
PVector velocity;
For simplicity, location(x,y) is a replacement for the previous x and y properties, so where I was setting the starting position as …
x = width / 2;
y = (int)random(10, height-10);
.. I now use the set method to assign x and y properties of location …
this.location.set(surface.x+(surface.w/2), surface.y+(surface.h/2));
The real power of vectors come into play on the movement of the ball i.e. instead of writing …
x += ( speed * horizontalDirection );
y += ( speed * verticalDirection );
.. the new version, using the add method and static function mult will simply be …
this.location.add(PVector.mult(this.velocity, this.speed));
Where the previous horizontalDirection and verticalDirection properties have been replaced with velocity(x,y) … the resulting new location would be …
| location | velocity | speed | (new location) | |||
|---|---|---|---|---|---|---|
| x | y | x | y | x | y | |
| 400.0 | 300.0 | -1.0 | 1.0 | 5.0 | 395.0 | 305.0 |
Learn: Do some further reading on the Processing PVector class, and it’s methods and properties.
Collisions
I have simplified the hits method of Paddle class, removed need to identify the Player, and used a combination of the horizontalDistance and verticalDistance to identify a collision.
boolean hits(Ball ball) {
  float horizontalDistance = abs(this.location.x - ball.location.x);
  float verticalDistance = ball.location.y - this.location.y;
  return  horizontalDistance < (ball.radius + this.w/2) &&
         (verticalDistance > 0 && verticalDistance < this.h);
  }
As the the ball.move() is called before the player.hits() check, and before the ball.display() method in the main pronguino file, the “collision” is checked for in advance, and leaves the ball displayed in its last position.
| ball | this (paddle) | horizontalDistance | verticalDistance | horizontalDistance < (ball.radius+this.w/2) | (verticalDistance>0 && verticalDistance<this.h) | hits | ||||||
|---|---|---|---|---|---|---|---|---|---|---|---|---|
| x | y | radius | x | y | w | h | c1 | c2 | c1 && c2 | |||
| 50 | 40 | 5 | 25 | 20 | 10 | 50 | 25 | 20 | false | true | false | |
| 45 | 45 | 5 | 25 | 20 | 10 | 50 | 20 | 25 | false | true | false | |
| 40 | 50 | 5 | 25 | 20 | 10 | 50 | 15 | 30 | false | true | false | |
| 35 | 55 | 5 | 25 | 20 | 10 | 50 | 10 | 35 | false | true | false | |
| 30 | 60 | 5 | 25 | 20 | 10 | 50 | 5 | 40 | true | true | true | |
Experiment: In the above example the options.ballSpeed has been set to 5.0, so the math involved is simpler, and where most of the game object co-ords are all dividable by 5.0, the collisions look reasonably smooth, however, I haven’t taken in consideration speed into the calculations of the collision, yet, play around with the speed settings and see what happens.
Debugging
One of the trickiest aspects of developing this game, is getting the collisions right, and as smooth as possible, due to the collision happening so fast, it is difficult to see what is actually happening, and know what to adjust, so I have introduced a few ideas to assist in the debugging of collisions.
Note: When in debug mode, you will see a trail of the ball when it goes off the surface, this is expected, due to snapshots not being captured correctly when the background is redrawn in draw() loop, so it has been disabled during debug.
Options
I have added a flag debug in the Settings which needs to be set to true in order to trigger debug actions, and also added a new class Debug, which includes flags such as …
boolean playerHitsBall;              // Debug option for when the paddle hits the ball
boolean ballPositionAtPlayerPaddle;  // Debug option for when the ball is re-positioned
… which determine areas that require debugging.
Points
In the display() methods of Ball and Paddle, the following code, which, when the relevant flags are set will display a subtle black dot where the center (x,y) of the ball is, and the starting point paddle line, so when a snapshot is taken, it acts a guide on what adjustments need to be made.
// Debug
if(options.debug && (debug.playerHitsBall || debug.paddleHitsBoundary)) {
  strokeWeight(1);
  stroke(#000000);
  point(this.location.x, this.location.y);
}
Snapshots
In the pronguino file, within the draw() method, you will see the following code …
if (player.hits(ball)) {

    // Debug
    if(options.debug && debug.playerHitsBall) {
        ball.display(true);
        saveFrame("debug/Player("+player.index+")-Paddle"+player.paddle.location+"-Hits-Ball"+ball.location);
    }
...
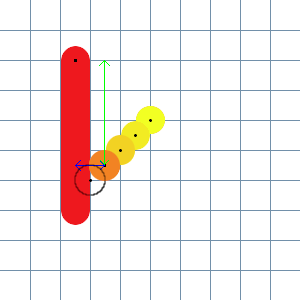
… where the frame at point of collision will save as an image, with the filename being made from the properties of the relevant objects involved i.e.
Player(1)-Paddle[ 710.0, 335.0, 0.0 ]-Hits-Ball[ 710.0, 380.0, 0.0 ].tif
It will also display the outline of where the ball would be at collision, see the modified code in Ball where it just changes the fill and colour before drawing, if true is passed in …
void display(boolean snapshot) {
...
// Colour
if(snapshot) {
  noFill();
  stroke(#000000);
} else { ...
Challenge: Have a go at implementing the debug code for paddeHitsBoundary and ballHitsBoundary options.
Conclusion
OK, so now we have a new look Pronguino, improved collision detection, and introduced vectors and some debugging techniques, also added a little more into the game by allowing a winner. Next will look into adding some more electronics.