Phorms
Introduction
In this post, we are going to look at creating some form fields (with a dive into more object oriented methods), which have been used to create a menu and an options screen to change some of the settings.
Scope
| Description | |
|---|---|
| Processing | Creating a custom form controls library. Adding a Menu and an Options screen. |
| Game | Adding game state for menu and options screens. |
| File | Reading and writing game options using JSON. |
Learning
| Description | |
|---|---|
| Object-Orientation | Key OO concepts: encapsulation, abstraction, interfaces, abstract classes, inheritance and polymorphism. |
| Form Controls | Building interactive form controls (Button, Input, Toggle, Slider, Frame) from scratch in Processing. |
| JSON File Handling | Reading and writing JSON files in Processing to persist settings between sessions. |
| Event Driven | Cascading mouse and keyboard events down through a class hierarchy. |
Getting Started
Recommended
I recommend that you go through the previous posts for this project, although completing the Arduino part of the project is not essential.
The Code
Processing
What’s New
The first thing I wanted to do in this stage was to move some of the game operations away from pronguino sketch into a new class Game. Also added a starting Menu, which allows us to change Options before we play.
| Class | Description |
|---|---|
| Game | Class to encapsulate game operations. – Options – State – Begin – Pause – Resume |
| Form | Contains a number of form control classes – Frame – ToggleControl – InputControl – SliderControl – ButtonControl |
| Menu | Class to encapsulate menu operation – Play – Options – Exit – Status Message |
What’s Changed
Most of the files have had a minor change due to moving Options into Game as a child property, below are the significant changes…
| File | Changes |
|---|---|
| pronguino | Implemented new Game class. Implemented new Menu class Handle serial errors as status messages Added further mouse/keyboard events Added game events |
| Ball | Added applyOptions() method |
| Constants | Added new menu/option states Added new status message colours Add new colours constants |
| Debug | Cleared constructor |
| Options | Added form controls for options Add file handling for options file Add various methods/events |
| Paddle | Added applyOptions() method |
| Player | Added name property Added applyOptions() method Added serve() method |
| Scoreboard | Remove score property Added player property Display player.score on scoreboard Display player.name above scoreboard |
Challenge: I have started adding TODO’s at top of some of the files, adding items I’d like to do, should do, or may do in the future. Sometimes when I am putting the code together for these posts it is easy to get carried away, but I have to find the cut-off point, so feel free to scan these and have a go yourself.
Play
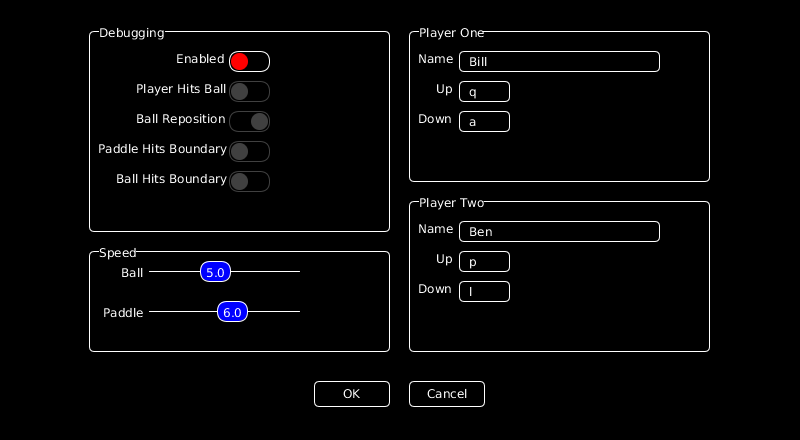
The rules haven’t changed, keys and controls are still the same, now you can select Options from the Menu and change your name(s), set speed, or switch on debugging without changing the code!
Forms
When a Processing application starts it runs setup() once, and then runs the code continuously in the loop draw() method, where the objects get displayed. With two new “forms” being added I have added some further state constants….
static final int STATE_MENU = 5;      // Game menu showing
static final int STATE_OPTIONS = 6;   // Game options showing
… which get set accordingly … at the start…
void setup() {
   ...
   game.state = Constants.STATE_MENU;
   ...
}
… and when Options button clicked…
void optionsButtonClicked() {
  game.state = Constants.STATE_OPTIONS;
}
.. and these are used to determine what gets displayed during draw() method…
// Display ..
switch(game.state) {
  case Constants.STATE_MENU:
    background(game.options.backgroundColour);
    menu.display();
    break;
  case Constants.STATE_OPTIONS:
    background(game.options.backgroundColour);
    game.options.display();
    break;
  default:
    ...
    // Game Objects
    ...
    break;
}
In preparation for adding controls onto the form, we need to know when certain events happen while the form is shown, these events can only be triggered in the main sketch (pronguino) and need to be cascaded down to the form … i.e.
void mouseClicked() {
  ...
  if (game.state == Constants.STATE_MENU) {
    // Cascade down
    menu.clicked();
  }
}
.. and so the clicked() method is called in Menu class … it is in this method, the form still doesn’t know what has been clicked so checks each controls clicked() method to identify, and act accordingly.
void clicked() {
  // Check if options button clicked ..
  if(this.optionsButton.clicked()) {
    // Call event method
    optionsButtonClicked();
  }
  ...
}
If any of the controls used on a form have the validate() method and valid property implemented, a valid() method can be added to check all the relevant controls, which in this case is used to disable the OK button on the options form, to prevent invalid data being saved…
boolean valid() {
  // Currently only input controls need validation ...
  for (int id=0; id < Constants.PLAYER_COUNT; id++) {
    // ... this will return false if any of the controls are invalid
    if (!this.playerNameInputs[id].valid || !this.playerUpInputs[id].valid || !this.playerDownInputs[id].valid) {
      return false;
    }
  }
  // returns true on completion of loop, nothing invalid
  return true;
}
Controls
Processing is great for fast visual imagery and for games too, sometimes though you need to be able to interact with an application to adjust settings or enter data etc. There are a number of libraries available for such form controls, these would have been written in Java (which is what Processing language is based on).
As an exercise I decided to put some together using the “out-of-the-box” language, (will have a look at building own Java library another time) this allows me to further explore keyboard and mouse events, graphic/text combinations, and is also a good example to demonstrate some object-oriented methods.
| Control | Description | Enabled | Disabled |
|---|---|---|---|
| Button | Simple push button. |  |
 |
| Input | Simple text entry. |  |
 |
| Toggle | Used for true/false values |  |
 |
| Slider | Choose value within a range by dragging slider along gauge. | 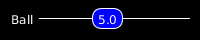 |
 |
| Frame | Used to group related controls / text. | 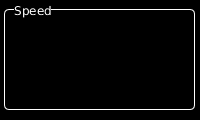 |
N/A |
In this section we will look into behavior and drawing of the controls, a further look into how they are put together will be covered more in Object-Orientation …
All the controls that extend the Control class will have the following properties… although not all are necessarily used…
| Property | Type | Description |
|---|---|---|
| x | float | X co-ordinate |
| y | float | Y co-ordinate |
| w | float | Width |
| h | float | Height |
| label | String | Label |
| hasFocus | boolean | Has control got focus |
| disabled | boolean | Is control disabled |
Also all the controls will share common functionality through these Control methods… although not all are necessarily called… and some may even override implementation…
| Method | Return | Description |
|---|---|---|
| over() | boolean | Returns true if the mouse cursor is over the control. |
| display() | void | Draws the control. |
| clicked() | boolean | Returns true if the mouse button is clicked over the control. |
Button
… the ButtonControl requires an additional property…
| Property | Type | Description |
|---|---|---|
| caption | String | text displayed on button |
.. and overrides the following method from Control …
| Method | Return | Description |
|---|---|---|
| display() | void | Draws the button |
After declaring the ButtonControl, we create it in the containing “form” class … in this case Options …
ButtonControl okButton;
...
this.okButton = new ButtonControl(305,450,75,25,"OK");
… the additional property is set in the controls constructor, the other properties are set by calling super(…) which calls the relevant constructor in the Control class.
class ButtonControl extends Control {
  ...
  String caption;
  ...
  ButtonControl(float x, float y, float w, float h, String caption) {
    // Call the constructor of the superclass
    super(x, y, w, h);
    // Sets own properties
    this.caption = caption;
  }
  ...
}
When the mouseClicked() event is triggered in the pronguino sketch, and the state is set to STATE_OPTIONS, the following method is called in the Options class…
void clicked() {
  ...
  if(this.okButton.clicked()) {
    this.okButtonClicked();
  }
  ...
}
.. which will then check with the following method in the Control class whether this control has been clicked()…
boolean clicked() {
  this.hasFocus = this.over();
  return this.hasFocus;
}
.. it will do this by calling the over() method in the Control class, which will check to see if the mouseX and mouseY are within the boundary of the control, ignoring this check if control disabled…
boolean over()  {
  if(this.disabled) {
    return false;
  }
  if (mouseX >= this.x && mouseX <= this.x+this.w &&
      mouseY >= this.y && mouseY <= this.y+this.h) {
    return true;
  } else {
    return false;
  }
}
When the button gets drawn, it uses the disabled property and over() method to determine which colours to use, one notable method being used here is textAlign() … it tells the following text() method how to interpret the x, y parameters .. in this case the CENTER point is in the middle of the text.
void display() {
  // Border colour depending on disabled state
  stroke(this.disabled ? Constants.CONTROL_COLOUR_DISABLED : Constants.CONTROL_COLOUR_ENABLED);

  // Draw button, colour depending on whether mouse over
  fill(this.over() ? Constants.CONTROL_COLOUR_ENABLED : Constants.CONTROL_COLOUR_BACKGROUND);
  rectMode(CORNER);
  rect(this.x, this.y, this.w, this.h, 5);

  // Text, colour depending on disabled state / or mouse over
  fill(this.over() ? Constants.CONTROL_COLOUR_BACKGROUND : this.disabled ? Constants.CONTROL_COLOUR_DISABLED : Constants.CONTROL_COLOUR_ENABLED);
  textAlign(CENTER,CENTER);
  text(this.caption, this.x+(this.w/2), this.y+(this.h/2)-2);
}
Input
… the InputControl requires additional properties…
| Property | Type | Description |
|---|---|---|
| value | String | Value being input/edited |
| maxLength | int | Maximum length of value |
| valid | boolean | Is value a valid input |
… and the following additional methods…
| Method | Return | Description |
|---|---|---|
| value(String) | void | Sets the value property with a String |
| value(char) | void | Sets the value property with a String converted from a char |
| validate() | void | Sets the valid property |
| typed(char) | void | Event method called when key typed. |
.. and overrides the following method from Control …
| Method | Return | Description |
|---|---|---|
| display() | void | Draws the input control |
After declaring the InputControl, in this case an array, we create it in the containing “form” class … in this case Options …
...
InputControl[] playerNameInputs;
...
this.playerNameInputs[Constants.PLAYER_ONE] = new InputControl(450,120,200,20, "Name", 10, this.names[Constants.PLAYER_ONE]);
...
… with the exception of valid , … the additional properties are set in the controls constructor, the other properties are set by calling super(...) which calls the relevant constructor in the Control class.
InputControl(float x, float y, float w, float h, String label, int maxLength, String value) {
  super(x, y, w, h, label);
  this.maxLength = maxLength;
  this.value(value);
}
… a setter method value(...) is used to set the value …
void value(String value) {
  this.value = value;
  this.validate();
}
… which also calls the validate() method, which sets the valid property accordingly …
void validate() {
  this.valid = (this.value.length() > 0);
}
When the mouseClicked() event is triggered in the pronguino sketch, and the state is set to STATE_OPTIONS, the following method is called in the Options class …
void clicked() {
  ...
  for (int id=0; id < Constants.PLAYER_COUNT; id++) {
    this.playerNameInputs[id].clicked();
    ...
  }
  ...
}
… which will then check with the following method in the Control class whether this control has been clicked() … however, note how this method is called slightly differently, we are not interested in the result of method, as we don’t have to do anything at this level.
Note: This is a good way to get around the fact that the following method implementations are not allowed i.e. two methods of the same name that have different return types i.e. …
void clicked() { … }
boolean clicked() { … }
.. as with ButtonControl the clicked() method in Control class will get called .. however, this time we are more interested in the hasFocus property …
boolean clicked() {
  this.hasFocus = this.over();
  return this.hasFocus;
}
When the keyTyped() event is triggered in the pronguino sketch, and the state is set to STATE_OPTIONS, the following method is called in the Options class…
void typed(char typedKey) {
  ...
  for (int id=0; id < Constants.PLAYER_COUNT; id++) {
    this.playerNameInputs[id].typed(typedKey);
    ...
  }
}
.. which will then call typed(char typedKey) in the InputControl class, if the control has focus, adds typedKey to value, checking the maxLength, or if BACKSPACE is typed, removes last character from value, continuously checking if value is valid…
void typed(char typedKey) {
  if(this.hasFocus) {
    if(typedKey==BACKSPACE && this.value.length() > 0) {
      this.value = this.value.substring(0, this.value.length()-1);
    } else {
      if(this.value.length() < this.maxLength && typedKey != BACKSPACE) {
        this.value += typedKey;
      }
    }
  }
  this.validate();
}
Using basic drawing methods, coloured based on disabled and valid properties, note when drawing the value, adds a _ afterwards when focused, acting as a cursor …
void display() {

  // Label
  fill(Constants.CONTROL_COLOUR_LABEL);
  textAlign(RIGHT, TOP);
  text(this.label, this.x, this.y);

  // Border
  if(this.valid) {
    stroke(this.disabled ? Constants.CONTROL_COLOUR_DISABLED : Constants.CONTROL_COLOUR_ENABLED);
  } else {
    stroke(Constants.CONTROL_COLOUR_INVALID);
  }

  // Input area
  fill(Constants.CONTROL_COLOUR_BACKGROUND);
  rectMode(CORNER);
  rect(this.x, this.y, this.w, this.h, 5);

  // Value
  fill(this.disabled ? Constants.CONTROL_COLOUR_DISABLED : Constants.CONTROL_COLOUR_ENABLED);
  textAlign(LEFT,CENTER);
  // Add a 'cursor' after value if it has focus
  text(this.value + (this.hasFocus ? '_' : ""), this.x+10, this.y+(this.h/2)-1);
}
Challenge: Have a go at either amending or extending the InputControl, to allow only number relating characters i.e. 0-9, ‘.’, ‘-‘ etc, extending is probably the better option, then you don’t ‘break’ InputControl .. just create a new one called say ‘NumberInputControl’ ? You could add a FrameControl titled ‘Net’ and put all the net related options here ?
Toggle
… the ToggleControl requires an additional property…
| Property | Type | Description |
|---|---|---|
| value | boolean | On / Off |
… and the following additional method…
| Method | Return | Description |
|---|---|---|
| value(boolean) | void | Sets the value property with a boolean |
.. and overrides the following methods from Control …
| Method | Return | Description |
|---|---|---|
| clicked() | boolean | Returns true if the mouse button is clicked over the control. |
| display() | void | Draws the toggle control |
After declaring the ToggleControl, we create it in the containing “form” class … in this case Options…
...
ToggleControl debugEnabledToggle;
...
this.debugEnabledToggle = new ToggleControl(220,120,40,20, "Enabled", this.debug.enabled);
… the additional property is set in the controls constructor, the other properties are set by calling super(...) which calls the relevant constructor in the Control class.
ToggleControl(float x, float y, float w, float h, String label, boolean value) {
  super(x, y, w, h, label);
  this.value(value);
}
… a setter method value(...) is used to set the value …
void value(boolean value) {
  this.value = value;
}
When the mouseClicked() event is triggered in the pronguino sketch, and the state is set to STATE_OPTIONS, the following method is called in the Options class…
void clicked() {
  ...
  this.debugEnabledToggle.clicked();
  ...
}
.. when the clicked() method in the ToggleControl class gets called .. first it checks with the superclass to see if control has been clicked, if it has, it uses the logical NOT operator to invert the current boolean value.
boolean clicked() {
  if(super.clicked()) {
    this.value(!this.value);
    return true;
  } else {
    return false;
  }
}
Using basic drawing methods, coloured based on disabled and value properties…
void display() {

  // Label
  fill(Constants.CONTROL_COLOUR_LABEL);
  textAlign(RIGHT, TOP);
  text(this.label, this.x, this.y);

  // Outline
  stroke(this.disabled ? Constants.CONTROL_COLOUR_DISABLED : Constants.CONTROL_COLOUR_ENABLED);
  fill(Constants.CONTROL_COLOUR_BACKGROUND);
  rectMode(CORNER);
  rect(this.x, this.y, this.w, this.h, this.h/2);

  // Switch
  noStroke();
  ellipseMode(CORNER);
  if(this.value) {
    fill(this.disabled ? Constants.CONTROL_COLOUR_DISABLED  : Constants.CONTROL_COLOUR_ON);
    ellipse(this.x+(this.w/2)+2, this.y+2, this.h-3, this.h-3);
  } else {
    fill(this.disabled ? Constants.CONTROL_COLOUR_DISABLED  : Constants.CONTROL_COLOUR_OFF);
    ellipse(this.x+2, this.y+2, this.h-3, this.h-3);
  }
}
Slider
… the SliderControl requires additional properties…
| Property | Type | Description |
|---|---|---|
| value | float | Value being set |
| minValue | float | Minimum value allowed. |
| maxValue | float | Maximum value allowed. |
| gaugeW | float | Width of ‘gauge’ in pixels |
| sliderButton | SliderButtonControl | Slider button |
… and the following additional methods…
| Method | Returns | Description |
|---|---|---|
| value(float) | void | Sets the value property with a float |
| pressed() | void | Event method called when mouse button pressed. |
| released() | void | Event method called when mouse button released. |
| dragged() | void | Event method called when mouse button pressed and dragged. |
.. and overrides the following method from Control …
| Method | Returns | Description |
|---|---|---|
| display() | void | Draws the slider control |
After declaring the SliderControl, we create it in the containing “form” class … in this case Options…
...
SliderControl ballSpeedSlider;
...
this.ballSpeedSlider = new SliderControl(140, 340, 30, 20, "Ball", 1.0, 10.0, this.ballSpeed);
...
… the additional properties are set in the controls constructor, the other properties are set by calling super(...) which calls the relevant constructor in the Control class.
SliderControl(float x, float y, float w, float h, String label, float minValue, float maxValue, float value) {
    super(x, y, w, h, label);
    this.minValue = minValue;
    this.maxValue = maxValue;
    this.value(value);
    this.gaugeW = ((this.maxValue - this.minValue) / 2) * this.w;
    this.sliderButton = new SliderButtonControl(this, map(this.value, this.minValue, this.maxValue, this.x+(this.w/2), this.x+this.gaugeW-(this.w/2)), this.y, this.w, this.h);
    }
… a setter method value(…) is used to set the value …
void value(float value) {
  this.value = value;
}
When the mousePressed(), mouseReleased() or mouseDragged() events are triggered in the pronguino sketch, and the state is set to STATE_OPTIONS, the following methods are called in the Options class…
void pressed() {
  ...
  this.ballSpeedSlider.pressed();
  ...
}

void released() {
  ...
  this.ballSpeedSlider.released();
  ...
}

void dragged() {
  ...
  this.ballSpeedSlider.dragged();
  ...
}
.. which will then call the pressed(), released() or dragged() respectively in the SliderControl class … as it its the child class SliderButtonControl that is more interested in these events happening the call is passed on…
void pressed() {
  this.sliderButton.pressed();
}

void released() {
  this.sliderButton.released();
}

void dragged() {
  this.sliderButton.dragged();
}
.. and then the display() method draws the control, note the call to the child sliderButton.display() method.
void display() {

   // Label
   fill(Constants.CONTROL_COLOUR_LABEL);
   textAlign(RIGHT, CENTER);
   text(this.label, this.x, this.y);

   // Gauge
   stroke(this.disabled ? Constants.CONTROL_COLOUR_DISABLED : Constants.CONTROL_COLOUR_ENABLED);
   line(this.x, this.y, this.x+this.gaugeW, this.y);

   // Slider Button
   this.sliderButton.display();
}
SliderButtonControl
The SliderButtonControl is a child class of SliderControl, and only used by its parent to manage the buttons behaviour … it has no use outside of this …
class SliderControl extends Control {

  private class SliderButtonControl extends Control {

    // So we can access parent properties
    SliderControl parent;
    ...
  }
  ...
}
… the SliderButtonControl requires additional properties …
| Property | Type | Description |
|---|---|---|
| grabbed | boolean | Set when mouse button pressed or released. |
| parent | SliderControl | Access to parents properties i.e. value, x, y etc. |
… and the following additional methods …
| Method | Returns | Description |
|---|---|---|
| pressed() | void | Event method called when mouse button pressed. |
| released() | void | Event method called when mouse button released. |
| dragged() | void | Event method called when mouse button pressed and dragged. |
.. and overrides the following methods from Control …
| Method | Returns | Description |
|---|---|---|
| over() | boolean | True if mouse cursor over control. |
| display() | void | Draws the slider control |
After declaring the SliderButtonControl, we create it in its parent class … SliderControl …
...
SliderButtonControl sliderButton;
...
this.sliderButton = new SliderButtonControl(this, map(this.value, this.minValue, this.maxValue, this.x+(this.w/2), this.x+this.gaugeW-(this.w/2)), this.y, this.w, this.h);
...
… the additional properties are set in the controls constructor, the other properties are set by calling super(...) which calls the relevant constructor in the Control class.
SliderButtonControl(SliderControl parent, float x, float y, float w, float h) {
  super(x, y, w, h);
  this.parent = parent;
  this.grabbed = false;
}
.. when the pressed() method in the SliderButtonControl class gets called .. the grabbed flag gets set according to result of over() …
void pressed() {
  this.grabbed = this.over();
}
.. when the released() method in the SliderButtonControl class gets called .. the grabbed flag gets set to false …
void released() {
  this.grabbed = false;
}
.. when the dragged() method in the SliderButtonControl class gets called .. the x co-ord of the button gets continuously calculated by keeping the mouseX value within the bounds of its parent, using the constrain() method, and then calculates the new value for SliderControl, based on the new x co-ord …
void dragged() {
  if(this.grabbed) {
    this.x = constrain(mouseX, this.parent.x+(this.w/2), this.parent.x+this.parent.gaugeW-(this.w/2));
    this.parent.value(round(map(this.x, this.parent.x+(this.w/2), this.parent.x+this.parent.gaugeW-(this.w/2), this.parent.minValue, this.parent.maxValue)));
  }
}
… due to this controls x,y being at the center, a slightly different version of the over() method was required, so it gets overridden here …
boolean over()  {
  if(this.disabled) {
    return false;
  }
  if (mouseX >= this.x-(this.w/2) && mouseX <= this.x+(this.w/2) &&
      mouseY >= this.y-(this.h/2) && mouseY <= this.y+(this.h/2)) {
    return true;
  } else {
    return false;
  }
}
.. and then the display() method draws the slider button …
void display() {

  // Slider Button
  fill(this.parent.disabled ? Constants.CONTROL_COLOUR_DISABLED : Constants.CONTROL_COLOUR_SLIDER);
  rectMode(CENTER);
  rect(this.x, this.y, this.w, this.h, this.h/2);

  // Value
  fill(this.parent.disabled ? Constants.CONTROL_COLOUR_BACKGROUND : Constants.CONTROL_COLOUR_ENABLED );
  textAlign(CENTER, CENTER);
  text(str(this.parent.value), this.x, this.y);
}
Challenge: Have a go at creating a new, more specific control to adjust the size of the ball, you could create a new file to add this into, called, say… GameForm, keeping Form to be used for generic type controls. You could call this control something like BallSliderControl, that extends SliderControl (also adding BallSliderButtonControl, which would be the ball itself), adding additional properties such as ballRadius, and overriding methods such as over() and display(), where, instead of showing value, change the size of ‘ball’ etc. You could also do something similar with the the paddleHeight, drawing the paddle as the ‘gauge’ ?
Frame
The FrameControl requires an additional property…
| Property | Type | Description |
|---|---|---|
| title | String | Title text displayed on the frame. |
… no additional methods are required, just the following overridden method…
| Method | Return | Description |
|---|---|---|
| display() | void | Draws the frame control |
After declaring the FrameControl, we create it in the containing “form” class … in this case Options …
...
FrameControl debugFrame;
...
this.debugFrame = new FrameControl(80,100,300,200,"Debugging");
...
… the additional property is set in the controls constructor, the other properties are set by calling super(...) which calls the relevant constructor in the Control class.
FrameControl(float x, float y, float w, float h, String title) {
  super(x, y, w, h);
  this.title = title;
}
.. the display method simply draws a rounded rectangle, note when drawing the title, a background coloured rectangle is drawn first, based on the width of the title in pixels, based on the current font size using the method textWidth().
void display() {

  // Border
  stroke(Constants.CONTROL_COLOUR_FRAME);
  noFill();
  rectMode(CORNER);
  rect(this.x, this.y, this.w, this.h, 5);

  // Title background
  noStroke();
  fill(Constants.CONTROL_COLOUR_BACKGROUND);
  rect(this.x+10, this.y-10, textWidth(this.title)+2, 20);

  // Title
  fill(Constants.CONTROL_COLOUR_FRAME);
  textAlign(LEFT,CENTER);
  text(this.title, this.x+10, this.y);
}
Object-Orientation
Object-Orientation is a huge subject… and definitely not completely covered here, however, will cover some of the concepts within the context of this project.
Object
An object is an entity that has state and behaviour, in this project for example we have the following objects along with examples of some of their state and behaviour…
| Object | State | Behaviour |
|---|---|---|
| Ball | Colour Speed |
can move. can bounce. |
| Game | State In play ? |
can pause. can resume. |
| Input Control | Value Has focus ? |
can be clicked. can be typed in. |
.. each one of these is an instance of a class…
Class
A class is basically a blueprint from which an object is instantiated… each class can include fields, methods and constructors, these are some examples of classes used in this project…
| Class | Fields | Methods | Constructor |
|---|---|---|---|
| Player | score name |
serve() | Player(index) {…} |
| Paddle | player speed |
move() | Paddle(Player player) {…} |
Note: I have used the term ‘fields’, however there are other terms used with different meaning depending on the context i.e. properties, attributes etc, as Processing ignores scoping keywords such as private and public etc, any field declared in a class will be exposed as properties anyway.
.. in most cases objects are instantiated with the new keyword… so for players to be created…
for (int index=0; index < Constants.PLAYER_COUNT; index++) {
  players[index] = new Player(index);
}
..and the paddle…
Player(int index) {
  ...
  // Create Paddle
  this.paddle = new Paddle(this);
  ...
}
Encapsulation
The aim of encapsulation is to prevent some internal fields of the object being changed directly by “hiding” them, and then provide (or not provide, as they maybe fields that are just used internally) the means to access them via ‘getter’ and ‘setter’ methods.
As mentioned in the note above, Processing ignores scoping keywords such as private and public, so we can not really implement encapsulation, however, I will still go through some examples, as I am hoping to convert the form controls into a Java library, and this is where encapsulation will really matter.
A good example to show is the InputControl class …
class InputControl extends Control {

  String value;
  boolean valid;
  ...
  // Constructor
  InputControl(float x, float y, float w, float h, String label, int maxLength, String value) {
    ...
    this.setValue(value);
  }
  ...
  // Setter Method
  void setValue(String value) {
    this.value = value;
    this.validate();
  }
  ...
  // Validation
  void validate() {
    this.valid = (this.value.length() > 0);
  }
… here, I know that I can ‘get’ the value quite easily from an object of this class …
for(int id = 0; id < Constants.PLAYER_COUNT; id++) {
  this.names[id] = this.playerNameInputs[id].value;
  ...
}
.. however, the trouble starts if the value field were to be set directly, bypassing the setter method, for example …
for(int id = 0; id < Constants.PLAYER_COUNT; id++) {
  this.playerNameInputs[id].value = this.names[id];
}
.. if this were done, the validate() method would not get called, allowing invalid data to be entered, not good! So we use a ‘setter’ method …
void setValue(String value) {
  this.value = value;
  this.validate();
}
.. now, when I use the following, which has been implemented, the validate() method gets called …
for(int id = 0; id < Constants.PLAYER_COUNT; id++) {
  this.playerNameInputs[id].setValue(this.names[id]);
}
If this class was to be written in Java, it should look something like this …
class InputControl extends Control {

  private String value;    // Hide the value, preventing access directly
  ...
  private boolean valid;   // This should only be set internally
  ...
  // Constructor
  InputControl(float x, float y, float w, float h, String label, int maxLength, String value) {
    ...
    this.setValue(value);
  }
  ...
  // Setter method for value
  public void setValue(String value) {
    this.value = value;
    this.validate();
  }

  // Getter method for value
  public String getValue() {
    return this.value;
  }
  ...
  // Getter method for valid
  public boolean isValid() {
    return this.valid;
  }

  // Validation, only to be called internally
  private void validate() {
    this.valid = (this.value.length() > 0);
  }
Abstraction
Abstraction is a bit like saying, here is what you have got to do, I don’t care how you’re going to do it, but I might do some of it for you.
In this project that plays out in two layers. The IControl interface says “here is what you have got to do” — any control must have over(), clicked() and display(). The Control abstract class then says “I’ll do some of it for you” — it implements over() and clicked() with common behaviour, but leaves display() as abstract, because only the specific control knows how it should be drawn.
Interface
An interface is in essence a contract for any class that implements it has to follow, in this project we have the following interface…
interface IControl {
  boolean over();
  boolean clicked();
  void display();
}
.. so any class that implements this interface, has to create each method, whether it be abstract or non-abstract…
abstract class Control implements IControl {...}
It may be that in the future, I added some kind of read-only or visual control that doesn’t need over() and clicked(), just display() … I could then split the above interface to something like …
interface IControl {
  void display();
}

interface IClickableControl {
  boolean over();
  boolean clicked();
}
.. and the classes that implemented these would look like this …
// A visual only control
abstract class Control implements IControl {...}

// A Clickable control, but also needs to be a visual one
abstract class ClickableControl implements IControl, IClickableControl {...}
.. using interfaces is useful for expanding on classes without breaking existing code, and also if we were to have had a method that needs to do something with any of our controls, we could use …
void someMethod(IControl someControl) { ... }
… which would accept as an argument any object that was created from a class that implements IControl.
Abstract Class
An abstract class is basically creating our base (or superclass) class from which other classes will be derived from, in the case of this project, we have the Control class, which is….
- defining the common fields (i.e. x, y, w, h).
- defining and implementing non-abstract methods with common functionality (i.e. over, clicked)
- defining abstract method, that needs to be implemented by derived classes (i.e. display)
abstract class Control implements IControl {
  float x;
  float y;
  float w;
  float h;
  String label;
  boolean hasFocus = false;
  boolean disabled = false;
  ...
  boolean over()  {
    if(this.disabled) {
      return false;
    }
    if (mouseX >= this.x && mouseX <= this.x+this.w &&
        mouseY >= this.y && mouseY <= this.y+this.h) {
      return true;
    } else {
      return false;
    }
  }
  ...
  boolean clicked() {
    this.hasFocus = this.over();
    return this.hasFocus;
  }
  ...
  abstract void display();
}
Abstract classes cannot be instantiated, so doing something like this would not be allowed …
Control control = new Control(...);
Inheritance
Inheritance is where one class extends another, inheriting all of its properties and methods, these are the various types of inheritance…
Single Inheritance
There isn’t an example of single inheritance in this project, where one class is extended only once by another class.
Multiple Inheritance
Processing or Java does not support multiple inheritance, where one class can extend two or more other classes.
Hierarchical Inheritance
Hierarchical inheritance, is where many classes are derived from the same class, in the Forms file, all of the controls here are extended from the Control class.
Below is a simple example, showing the relevant code of the ButtonControl class, in this case all of the properties will be available, the over() and clicked() methods do not need to be implemented, but their functionality is inherited from the Control class, the only code that needs to be added is any additional properties of its own i.e. caption, and to implement the abstract method display()..
class ButtonControl extends Control {
  // Extra property required for button control
  String caption;
  ...
  // Implements the abstract method defined in Control
  void display() {
    ...
    // Code to draw button
    ...
  }
}
Multilevel Inheritance
Multilevel inheritance is where a class is derived from another already derived class, although there are no examples of this type, a challenge was set earlier in post that would use this type of inheritance, here is a bit of a spoiler …
class BallSliderControl extends SliderControl {...}
Polymorphism
Polymorphism, the word, is Greek, which translates roughly to “multiple or many forms”, so in the context of object-orientation we are transforming a class into different (but related) classes by changing the underlying behaviour of its methods. There are two types of polymorphism…
Compile Time
Compile time polymorphism is achieved using overloading, below, shows two overloaded constructors for the Control class, this allows any controls extending this to implement in two different ways, in this example a control with a label, and a control without…
Control(float x, float y, float w, float h, String label) { ... }

Control(float x, float y, float w, float h) { ... }
..so in the case of the ToggleControl, for example, the constructor calls super (…) which uses the relevant constructor of Control class (the superclass), and then sets its own properties…
class ToggleControl extends Control {
  boolean value;
  ...
  ToggleControl(float x, float y, float w, float h, String label, boolean value) {
    super(x, y, w, h, label);
    this.value(value);
  }
  ...
}
.. and in the case of the FrameControl, for example, which doesn’t display a label, it has it’s own property title, it only requires the use of x, y, w and h, which get set by calling super(...) which uses the relevant constructor of Control …
class FrameControl extends Control {
  String title;
  ...
  FrameControl(float x, float y, float w, float h, String title) {
    super(x, y, w, h);
    this.title = title;
  }
  ...
}
As well as constructors other methods can be overloaded, as in this case with the InputControl, we have setValue( ... ), the first overload accepts a String, and then validates, the second one allows a char to be passed in, and calls the other with char converted…
void setValue(String value) {
  this.value = value;
  this.validate();
}
...
void setValue(char value) {
  this.setValue(str(value));
}
Run Time
Run time polymorphism is achieved by overriding methods, where a subclass provides the specific implementation of a method declared in its superclass.
One example is in the SliderButtonControl, where the over() method needs to do the check for mouse over a little different from what was in Control class…
boolean over()  {
  // code to do something different than what was implemented on Control
}
… another example is in the ToggleControl, with clicked() , however, this time instead of replacing the implementation completely, it checks with the parent method first using super.clicked(), and continues with setting the value if true …
boolean clicked() {
  if(super.clicked()) {
    this.value(!this.value);
    return true;
  } else {
    return false;
  }
}
.. and finally, with all the classes derived from Control, they are to be drawn differently by overriding the method display(), which in the Control class had no implementation at all …
void display() {
  // draw the specific control here
}
File Handling (JSON)
Up until now all the options of the game have been hard coded into the Options class constructor, and we now have form to change some of them, but we need to keep these settings for when we close game and play again next time.
Below is the contents of options.json file located in the /data folder, it is formatted using JSON (JavaScript Object Notation)…
{
  "debug": {
    "playerHitsBall": true,
    "paddleHitsBoundary": false,
    "ballReposition": true,
    "ballHitsBoundary": false,
    "enabled": false
  },
  "players": [
    {
      "name": "Bill",
      "id": 0,
      "up": "q",
      "down": "a"
    },
    {
      "name": "Ben",
      "id": 1,
      "up": "p",
      "down": "l"
    }
  ],
  "ballSpeed": 5,
  "paddleSpeed": 6
}
Reading
.. in the Options class, the method read() loads the file into a JSONObject…
JSONObject optionsData;
...
this.optionsData = loadJSONObject("data/options.json");
.. and uses various methods to get the values of the keys from optionsData…
JSONObject debugOptions = optionsData.getJSONObject("debug");
this.debug.enabled = debugOptions.getBoolean("enabled");
...
this.ballSpeed = optionsData.getFloat("ballSpeed");
...
JSONArray playersOptions = optionsData.getJSONArray("players");
Writing
.. in the Options class, the method write() sets the values of the keys in optionsData…
this.optionsData.getJSONObject("debug").setBoolean("enabled",this.debug.enabled);
...
this.optionsData.setFloat("paddleSpeed", this.paddleSpeed);
...
playerOption.setString("name", names[id]);
… and saves optionsData back to the file…
saveJSONObject(this.optionsData, "data/options.json");
Further Reading
- Java OOP Concepts (Oracle) — official tutorial on objects, classes, inheritance, interfaces, and packages — all directly applicable to Processing
- Java Interfaces and Inheritance (Oracle) — deep dive into abstract classes, interfaces, and polymorphism in Java and Processing
- Processing JSON Reference — reference for
loadJSONObject,saveJSONObject, and theJSONObjectclass - Processing Mouse Events — reference for the mouse event functions used to drive the form controls
Conclusion
Ok, so that was quite a chunky post, but hopefully quite a useful one. We have gone from building a set of interactive form controls from scratch, to wiring them up with mouse and keyboard events, all the way through to persisting settings with JSON file handling.
Along the way the project has been a good vehicle for exploring some core object-orientation concepts — encapsulation keeping data safe behind setter methods, abstraction through interfaces and abstract classes defining contracts for our controls, inheritance letting all the controls share common behaviour from the Control superclass, and polymorphism allowing each control to override and extend that behaviour in its own way.
It is also worth noting that although Processing does not enforce access modifiers like private and public, writing the code as if it did — using getter and setter methods, keeping validation internal — is good practice and will matter if the form controls ever get converted into a proper Java library.
What next? There is something missing, something that all video games should have… Next up … Sounduino.