Sounduino
What would a video game be without sound? Not a very good one! So we are going to add a piezo to the circuit to generate game sounds and also add some processing code, so that when the Arduino UNO is disconnected, sound will play through your computer speakers.
Introduction
After some digging on the web, I managed to find the actual frequency and duration for the sounds used in the original Pong game…
| Sound | Frequency | Duration | Listen |
|---|---|---|---|
| Ball hits wall | 226 Hz | 16 ms | |
| Paddle hits ball | 459 Hz | 96 ms | |
| Point scored | 490 Hz | 257 ms |
… I have implemented these into the Arduino Pronguino Library Speaker class, and also created Waveform Audio files for each of the game sounds (which are also used in the table above) that are played through the Speaker class in the Processing code, these .wav files were generated using an online tone generator, there are quite a few to choose from, and will ask for some/all of the following parameters…
| Parameter | Wall Sound | Paddle Sound | Point Sound |
|---|---|---|---|
| Depth | 16-bit | 16-bit | 16-bit |
| Wave | Square | Square | Square |
| Frequency (Hertz) | 226 Hz | 459 Hz | 490 Hz |
| Duration (Milliseconds) | 16 ms | 96 ms | 257 ms |
| Sample Rate (Kilohertz) | 14.1 kHz | 14.1 kHz | 14.1 kHz |
| Amplitude/Volume | (experiment) | (experiment) | (experiment) |
Challenge: Find or create more modern versions of these game sounds, maybe tennis / table tennis sounds ?
Scope
| Description | |
|---|---|
| Circuit | Adding a piezo buzzer to the existing circuit. |
| Arduino | Extending the component and Pronguino libraries with piezo support. Using the tone() function to generate sounds. |
| Processing | Adding sound playback via the Minim library as a fallback when the Arduino is disconnected. |
| Game | Triggering sounds on game events: ball hitting a wall, a paddle, and a point being scored. |
Learning
| Description | |
|---|---|
| Piezo Buzzer | How a piezo buzzer works and how to wire it to the Arduino. |
tone() Function |
How to generate square wave tones at a specific frequency and duration using the Arduino tone() function. |
| Game Sounds | How the original Pong game sounds were reproduced using specific frequencies and durations. |
| Minim Library | How to use the Processing Minim library to play .wav audio files. |
| Software Fallback | How to design code that adapts behaviour based on whether the Arduino is connected. |
Getting Started
Recommended
I recommend reading through the Servuino and subsequent posts, as we are building circuit on top of the one built in Servuino.
Components
All the components that you need listed here are in the Arduino Starter Kit, as mentioned above, this is being built on top of previously built circuit, see existing components list, as well as the following…
| Component | Quantity |
|---|---|
| Piezo | 1 |
| 5mm orange wire | 1 |
| 20mm blue wire | 1 |
Note: I have been specific on the length in particular on the above wires, mainly for the smaller ones that are used just on the breadboard, so they are as flat as possible.
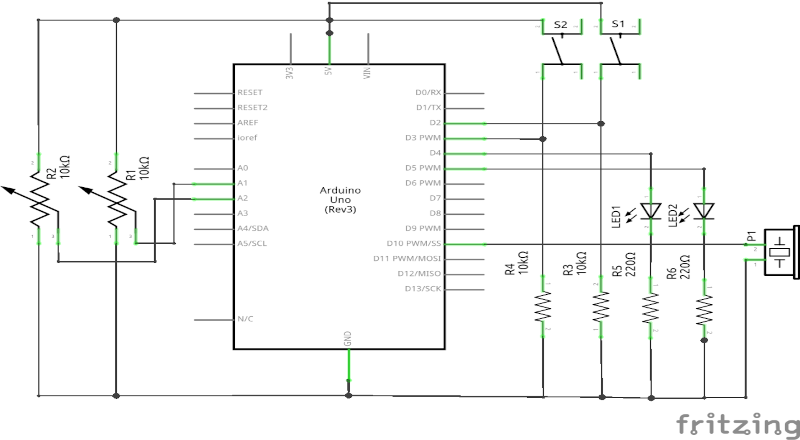
The Circuit
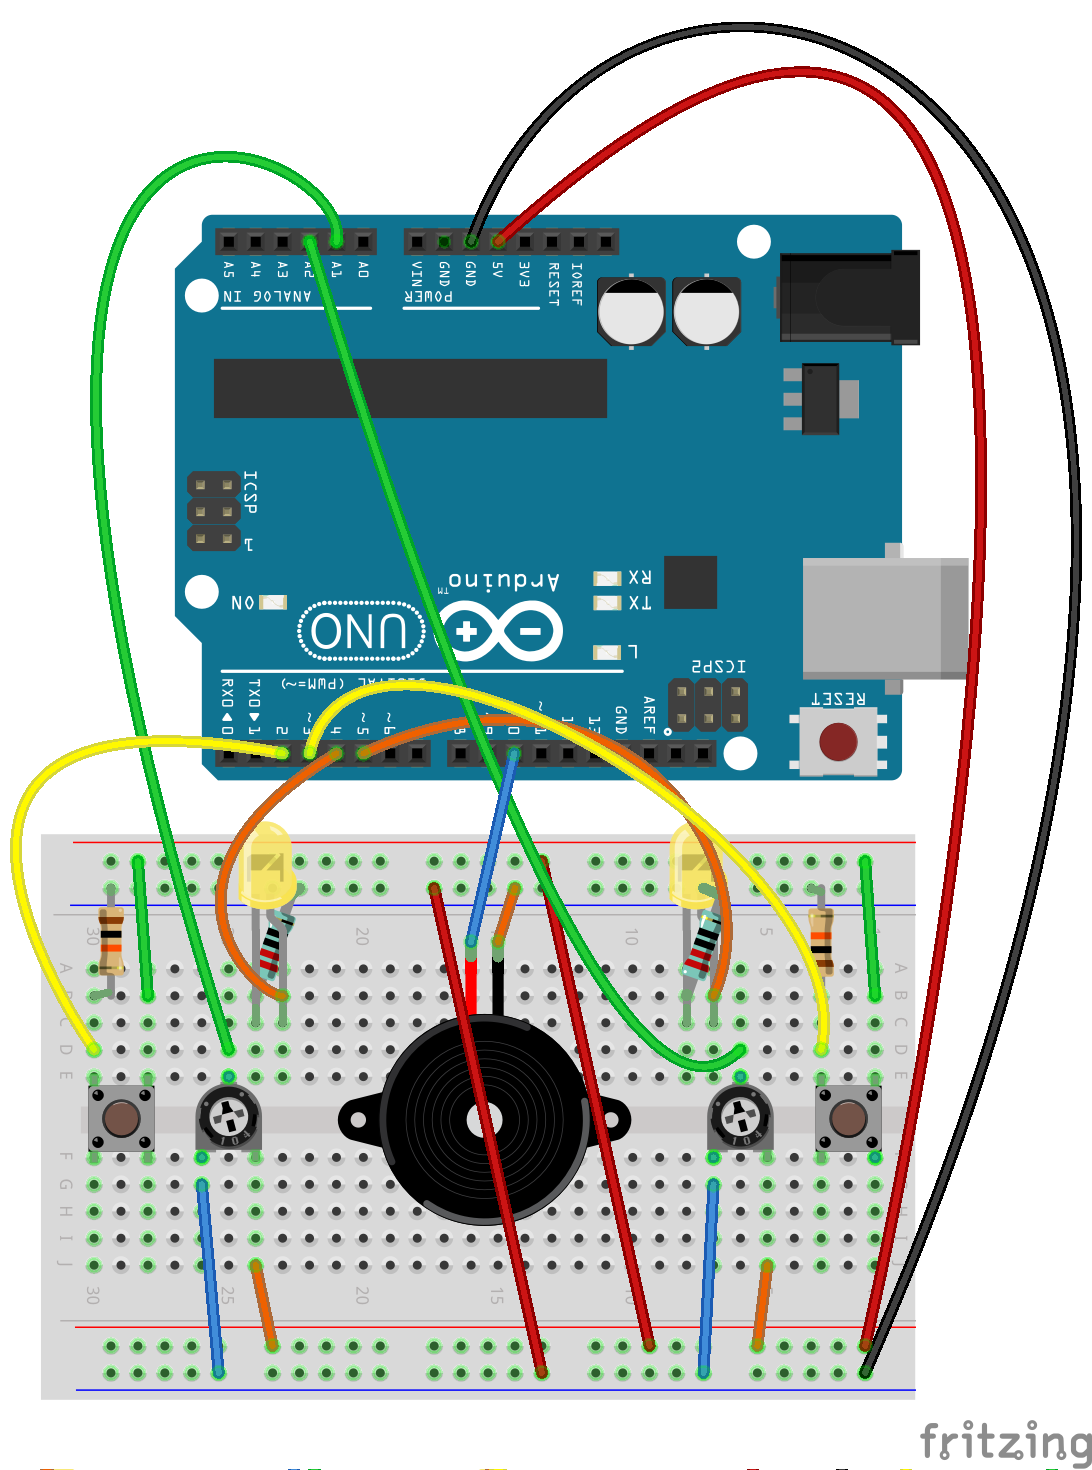
Fritzing Breadboard - Sounduino
Assembly
These instruction steps are used to assemble the circuit as shown above.
| Step | Instructions |
|---|---|
| 1 | Ensure you have unplugged from power source and at least one end of USB cable is removed from either the UNO / computer. |
| 2 | The piezo will be slightly different to that shown in circuit above, the pins will be underneath. Gently place the two pins over sockets, making a note of the row column numbers on board, and then push piezo in. |
| 3 | Insert one end of the 20mm blue wire into the digital pin D10, and the other end into nearest board socket on one of the rows noted above. |
| 4 | Insert one end of the 5mm orange wire into a socket on the GND bus line, and the other end into the nearest board socket on the other row noted above. |
Note: It is recommended not to use digital pins 0 and 1, due to them being used by USB serial communication.
The Code
Arduino
What’s New
There have been no new sketch files added.
What’s Changed
Component Library
With the introduction of the piezo, code has been added to the Component Library.
| File | Changes |
|---|---|
| component.h | Declaration of Piezo class added |
| component.cpp | Implementation of Piezo class added |
Pronguino Library
The concept of a “console”, which has the Speaker and Controllers “attached”, this has been encapsulated in the Pronguino Library GameConsole class.
| File | Changes |
|---|---|
| pronguino.h | Declaration of Speaker class added. Declaration of GameConsole class added |
| pronguino.cpp | Implementation of Speaker class added. Implementation of GameConsole class added |
Pronguino Sketch
| File | Changes |
|---|---|
| pronguino.ino | Added logic for GameConsole / Speaker. Added testing for GameConsole / Speaker |
Testing
As previously, if you change TESTING to be true, upload the new code, you will see the same results in the serial monitor as in Servuino Testing, but will now also play sounds depending on the button(s) pressed as follows…
| Sound | Button(s) |
|---|---|
| Ball hits wall | Left |
| Paddle hits ball | Right |
| Point scored | Left+Right |
Troubleshooting
Check the following, as well as items in previous Troubleshooting guide….
| Issue | Check |
|---|---|
| Nothing is working | Check Arduino is plugged in securely. Check red & black wires on board are secure. Check wires connecting bus lines. |
| No sound (when buttons pressed in test mode, or when events triggered such as ball hits wall etc) | Check piezo is firmly pushed in. Check the wires to D10 are connected ok. Check the wires to GND are ok. Check wires from buttons are ok. |
Challenge: As I write the code, sometimes I have little ideas, notes to improve or fix things, see if you can tackle any that you see a the top of some of the code files, feel free to comment any questions you may have.
Processing
What’s New
After some experimentation with trying to create the correct tones / and also .wav playback using the standard Sound Library, I ended up using the Minim library, which simplified the process of .wav playback.
You will need to install the Minim library from the Processing IDE…
Sketch -> Import Library -> Manage Libraries… and search for “minim”
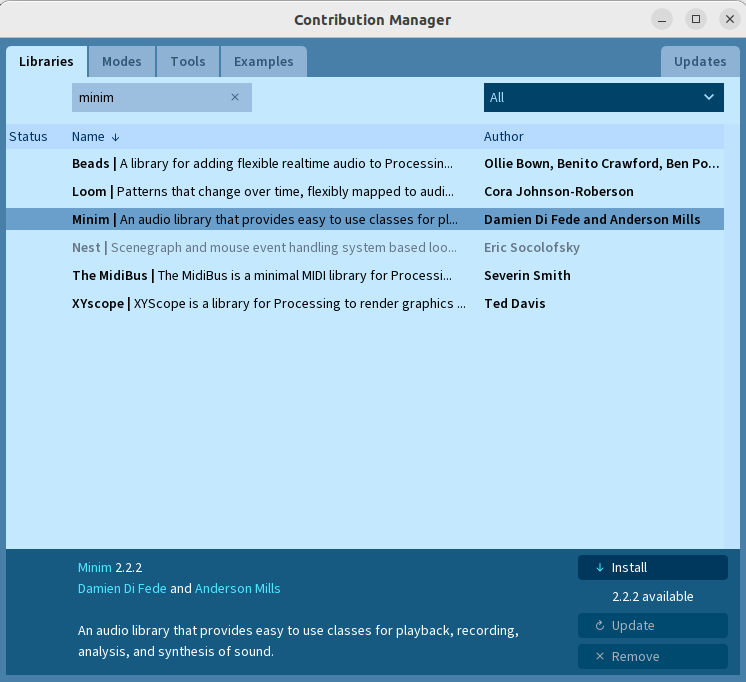
Manage Libraries - Minim
I have added a Speaker interface along with implementations for an ExternalSpeaker (Arduino) and InternalSpeaker (Computer), and also introduced the Console interface, with implementations for ExternalConsole and InternalConsole, to look after the controllers and speaker.
| File | Description |
|---|---|
| data/WallSound.wav | Wave Audio file (Ball hits wall) |
| data/PaddleSound.wav | Wave Audio file (Paddle hits ball) |
| data/PointSound.wav | Wave Audio file (Point scored) |
| Console | Console interface. AbstractConsole implementation of abstract class. ConsoleFactory, determines which type of console to create. ExternalConsole implementation. InternalConsole implementation |
| Speaker | Speaker Interface. ExternalSpeaker implementation. InternalSpeaker implementation |
What’s Changed
| File | Changes |
|---|---|
| Constants | Added data bit masks for sounds |
| Controller | Removed connected flag (moved to Console) |
| Paddle | Added position function to determine how/where to initially position paddle |
| Player | Use console to access controller |
| Pronguino | Some refactoring. Consumes Console class. Adds calls to sound methods in relevant places |
Troubleshooting
| Issue | Solution |
|---|---|
| The package “ddf” does not exist. You might be missing a library. No library found for ddf.minim | Make sure minim library has been installed via Sketch -> Import Library -> Manage Libraries… |
Challenge: See if you can utilise the standard Sound library to either produce the tones or playback .wav files, I tried a few things .. SqrOsc, AudioSample and SoundFile, but couldn’t quite get them to work as I would expect, I may have missed something.
Play
Break time… Turn off testing mode, and re-upload…. volume up (if not using UNO) .. no change in controls…
| Player | Up | Down | Pause/Resume/Serve |
|---|---|---|---|
| 1 | q | a | space |
| 2 | p | l | space |
Rules
No functional changes to game, so rules are the same..
| Rule | Description |
|---|---|
| Game Over | The first player to SCORE_MAX wins the game. |
| Opening Serve | PLAYER_ONE has the first service. |
| Player Misses | The same player serves. |
| Serve Direction | If the player serving has paddle in top half of surface, the direction will be down/left or right depending on player. If the player serving has paddle in bottom half of surface, the direction will be up/left or right depending on player. |
Piezo
A piezo sounder contains a piezo electric vibration plate within a moulded case. Sound is emitted when a voltage is applied and the piezo element inside the case vibrates. I won’t get into the details of how it works, just keeping simple for the context of this project.
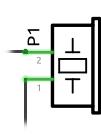
Terminal 1 (\(T_1\)) connected to GND.
Terminal 2 (\(T_2\)) connected to digital pin D10.
The tone() function generates a square wave where the duty cycle is 50% (HIGH half the time, LOW half the time), at a given frequency in cycles per second (Hertz), for a specified duration in milliseconds to the required pin, in this case digital pin D10.
Learn: I find it important to get to know your components, and how they work, it helps when things don’t work as planned, look up the datasheets of the components to get data to be used to equations such as Ohms law to make sure you choose correctly.
Conclusion
A reasonably easy addition to this project. We have added a piezo buzzer to the circuit, used the tone() function to generate game sounds at the accurate frequencies from the original Pong game, and introduced a software fallback using the Minim library so that sounds are heard regardless of whether the Arduino is connected. Throughout these posts I have hopefully covered some of the very basics of a classic retro game — building the circuit, writing the software, and now bringing it to life with sound. I will probably be referring back to some posts or sections in future projects.